Lexus ES: Removal
REMOVAL
PROCEDURE
1. REMOVE FRONT WHEEL OPENING EXTENSION PAD RH
Click here .gif)
.gif)
2. REMOVE FRONT WHEEL OPENING EXTENSION PAD LH
Click here .gif)
.gif)
3. REMOVE NO. 1 ENGINE UNDER COVER
Click here .gif)
.gif)
4. REMOVE NO. 2 ENGINE UNDER COVER ASSEMBLY
Click here .gif)
.gif)
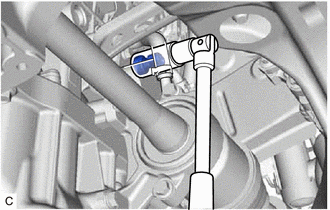
5. REMOVE OIL PRESSURE AND TEMPERATURE SENSOR
(a) Disconnect the oil pressure and temperature sensor connector.
| (b) Using a 24 mm deep socket wrench, remove the oil pressure and temperature sensor. NOTICE: If the oil pressure and temperature sensor is dropped or subjected to a strong impact, replace it with a new one. |
|
READ NEXT:
 Inspection
INSPECTION PROCEDURE 1. INSPECT OIL PRESSURE AND TEMPERATURE SENSOR (a) Check the oil pressure and temperature sensor output voltage. (1) Apply 5 V between terminals 3 (VC) and 2 (GND). NOTICE:
 Installation
INSTALLATION PROCEDURE 1. INSTALL OIL PRESSURE AND TEMPERATURE SENSOR (a) Apply adhesive to the area shown in the illustration. Adhesive: Toyota Genuine Adhesive 1344, Three Bond 1344 or equivalent
SEE MORE:
 Key-off Operation Function Operates even if Operating Conditions are not Satisfied
DESCRIPTION The sliding roof ECU (sliding roof drive gear sub-assembly) operates its built-in motor according to the sliding roof switch (map light sub-assembly) operation. Using the sliding roof switch (map light sub-assembly), if the sliding roof can be operated normally when 45 seconds or more ha
 Components
COMPONENTS ILLUSTRATION *1 LUGGAGE COMPARTMENT FLOOR MAT *2 SPARE WHEEL COVER TRAY ILLUSTRATION *1 LUGGAGE COMPARTMENT DOOR WEATHERSTRIP *2 REAR FLOOR FINISH PLATE *3 LUGGAGE HOLD BELT STRIKER ASSEMBLY - - ● Non-reusable part - -
© 2016-2026 Copyright www.lexguide.net


