Lexus ES: Removal
REMOVAL
PROCEDURE
1. REMOVE FRONT FENDER APRON SEAL RH
Click here .gif)
2. DRAIN ENGINE OIL
Click here
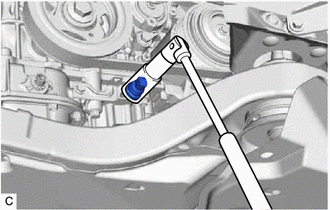
3. REMOVE ENGINE OIL PRESSURE SWITCH ASSEMBLY
| (a) Disengage the clamp to disconnect the wire harness protector. |
|

(b) Disconnect the engine oil pressure switch assembly connector.
| (c) Using a 24 mm deep socket wrench, remove the engine oil pressure switch assembly. |
|
READ NEXT:
 Inspection
INSPECTION PROCEDURE 1. INSPECT ENGINE OIL PRESSURE SWITCH ASSEMBLY (a) Disengage the clamp to disconnect the wire harness protector. *1 Wire Harness Protector (b) Disconnec
Installation
INSTALLATION PROCEDURE 1. INSTALL ENGINE OIL PRESSURE SWITCH ASSEMBLY (a) Apply adhesive to 2 or 3 threads of the engine oil pressure switch assembly. Adhesive: Toyota Genuine Adhesive 1344, Three
SEE MORE:
Components
COMPONENTS ILLUSTRATION *A Type A *B Type B *1 FRONT WHEEL OPENING EXTENSION PAD LH *2 FRONT WHEEL OPENING EXTENSION PAD RH *3 NO. 1 ENGINE UNDER COVER *4 NO. 3 ENGINE UNDER COVER N*m (kgf*cm, ft.*lbf): Specified torque - - ILLUSTRATION *A w/ Perform
Camshaft Position Sensor "B" Bank 1 Signal Stuck in Range (P03652A,P036531,P039031)
DESCRIPTION Refer to DTC P036511. Click here DTC No. Detection Item DTC Detection Condition Trouble Area MIL Memory Note P03652A Camshaft Position Sensor "B" Bank 1 Signal Stuck in Range No VVT sensor (for exhaust camshaft of bank 1) signal to ECM while engine cranking (1 tr
© 2016-2026 Copyright www.lexguide.net
