Lexus ES: Inspection
INSPECTION
PROCEDURE
1. INSPECT ENGINE OIL PRESSURE SWITCH ASSEMBLY
| (a) Disengage the clamp to disconnect the wire harness protector. |
|
.png)
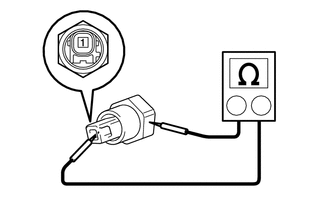
(b) Disconnect the engine oil pressure switch assembly connector.
(c) Start the engine.
| (d) Measure the resistance according to the value(s) in the table below. Standard Resistance:
If the result is not as specified, replace the engine oil pressure switch assembly. |
|
(e) Connect the engine oil pressure switch assembly connector.
(f) Engage the clamp to connect the wire harness protector.
READ NEXT:
 Installation
INSTALLATION PROCEDURE 1. INSTALL ENGINE OIL PRESSURE SWITCH ASSEMBLY (a) Apply adhesive to 2 or 3 threads of the engine oil pressure switch assembly. Adhesive: Toyota Genuine Adhesive 1344, Three
Components
COMPONENTS ILLUSTRATION *A w/ Stud Bolt *B w/o Stud Bolt *1 TIMING CHAIN CASE OIL SEAL *2 TIMING CHAIN COVER ASSEMBLY *3 OIL PUMP GASKET - - N*m (kgf*cm, ft.*lbf):
SEE MORE:
Driver Side Camera Video Sync Signal Malfunction (C1686)
DESCRIPTION This DTC is stored if the parking assist ECU judges as a result of its self check that a synchronization problem is occurring in the image signal sent from the driver side television camera assembly to the parking assist ECU. DTC No. Detection Item DTC Detection Condition Troubl
Panoramic Moon Roof System does not Operate
DESCRIPTION The sliding roof ECU (sliding roof drive gear assembly) and roof sunshade ECU (sliding roof drive gear assembly) receive each other's position information from the main body ECU (multiplex network body ECU) via LIN communication. The sliding roof ECU (sliding roof drive gear assembly) an
© 2016-2026 Copyright www.lexguide.net
