Lexus ES: Installation
Lexus ES (XZ10) Service Manual / Engine & Hybrid System / 2gr-fks (lubrication) / Oil Pressure Switch / Installation
INSTALLATION
PROCEDURE
1. INSTALL ENGINE OIL PRESSURE SWITCH ASSEMBLY
| (a) Apply adhesive to 2 or 3 threads of the engine oil pressure switch assembly. Adhesive: Toyota Genuine Adhesive 1344, Three Bond 1344 or equivalent NOTICE:
|
|
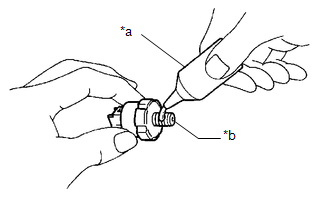
(b) Using a 24 mm deep socket wrench, install the engine oil pressure switch assembly.
Torque:
15 N·m {153 kgf·cm, 11 ft·lbf}
NOTICE:
Do not start the engine for at least 1 hour after installation.
(c) Connect the engine oil pressure switch assembly connector.
(d) Engage the clamp to connect the wire harness protector.
2. ADD ENGINE OIL
Click here .gif)
3. CHECK ENGINE OIL LEVEL
Click here
4. INSPECT FOR ENGINE OIL LEAK
Click here
5. INSTALL FRONT FENDER APRON SEAL RH
Click here
READ NEXT:
 Components
COMPONENTS ILLUSTRATION *A w/ Stud Bolt *B w/o Stud Bolt *1 TIMING CHAIN CASE OIL SEAL *2 TIMING CHAIN COVER ASSEMBLY *3 OIL PUMP GASKET - - N*m (kgf*cm, ft.*lbf):
Removal
REMOVAL CAUTION / NOTICE / HINT The necessary procedures (adjustment, calibration, initialization or registration) that must be performed after parts are removed and installed, or replaced during timi
SEE MORE:
Diagnostic Trouble Code Chart
DIAGNOSTIC TROUBLE CODE CHART Hybrid Control System DTC No. Detection Item MIL Warning Indicate Link P056014 System Voltage (BATT) Circuit Short to Ground or Open Comes on Master Warning Light: Comes on P060647 Hybrid/EV Powertrain Control Module Processor Watchdog /
Inspection
INSPECTION PROCEDURE 1. INSPECT PARK/NEUTRAL POSITION SWITCH ASSEMBLY (a) Measure the resistance according to the value(s) in the table below when the transmission control shaft lever is moved to each position. Standard Resistance: Tester Connection Condition Specified Condition 4 (B)
© 2016-2026 Copyright www.lexguide.net
