Lexus ES: Relay
On-vehicle Inspection
ON-VEHICLE INSPECTION
PROCEDURE
1. INSPECT HORN RELAY
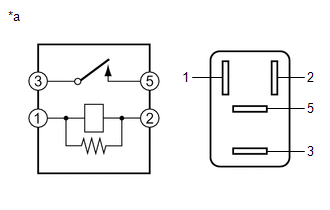
| *a | Component without harness connected (HORN Relay) |
(a) Measure the resistance according to the value(s) in the table below.
Standard Resistance:
| Tester Connection | Condition | Specified Condition |
|---|---|---|
| 3 - 5 | Auxiliary battery voltage not applied between terminals 1 and 2 | 10 kΩ or higher |
| 3 - 5 | Auxiliary battery voltage applied between terminals 1 and 2 | Below 1 Ω |
If the result is not as specified, replace the HORN relay.
READ NEXT:
 Automatic Light Control Sensor
ComponentsCOMPONENTS ILLUSTRATION *1 AUTOMATIC LIGHT CONTROL SENSOR *2 NO. 1 SPEAKER OPENING COVER ASSEMBLY On-vehicle InspectionON-VEHICLE INSPECTION PROCEDURE 1. INSPECT AUTOMATIC LIG
SEE MORE:
Power Trunk Lid does not Operate Using Outside Switch
DESCRIPTION The door control switch signal is sent to the luggage closer motor assembly. If the power trunk lid does not operate using the door control switch, a door control switch circuit malfunction is a possible cause. WIRING DIAGRAM CAUTION / NOTICE / HINT NOTICE: If the luggage closer motor a
Diagnosis System
DIAGNOSIS SYSTEM DESCRIPTION The main body ECU (multiplex network body ECU) and certification ECU (smart key ECU assembly) control the LIN communication system. LIN communication system data and Diagnostic Trouble Codes (DTCs) can be read through the Data Link Connector 3 (DLC3). When the system see
© 2016-2026 Copyright www.lexguide.net
