Lexus ES: Relay
On-vehicle Inspection
ON-VEHICLE INSPECTION
PROCEDURE
1. INSPECT HORN RELAY
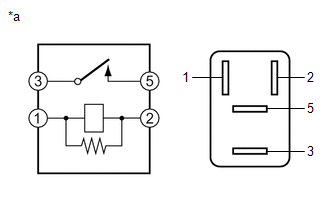
| *a | Component without harness connected (HORN Relay) |
(a) Measure the resistance according to the value(s) in the table below.
Standard Resistance:
| Tester Connection | Condition | Specified Condition |
|---|---|---|
| 3 - 5 | Auxiliary battery voltage not applied between terminals 1 and 2 | 10 kΩ or higher |
| 3 - 5 | Auxiliary battery voltage applied between terminals 1 and 2 | Below 1 Ω |
If the result is not as specified, replace the HORN relay.
READ NEXT:
 Automatic Light Control Sensor
ComponentsCOMPONENTS ILLUSTRATION *1 AUTOMATIC LIGHT CONTROL SENSOR *2 NO. 1 SPEAKER OPENING COVER ASSEMBLY On-vehicle InspectionON-VEHICLE INSPECTION PROCEDURE 1. INSPECT AUTOMATIC LIG
SEE MORE:
Brake System (C1A50)
DESCRIPTION When an electronically controlled brake system malfunction signal sent from the skid control ECU is detected by the clearance warning ECU assembly, DTC C1A50 is stored. DTC No. Detection Item DTC Detection Condition Trouble Area C1A50 Brake System When the power switch o
Parts Location
PARTS LOCATION ILLUSTRATION *1 SWING GRILLE ACTUATOR ASSEMBLY *2 MILLIMETER WAVE RADAR SENSOR ASSEMBLY *3 HEADLIGHT ECU SUB-ASSEMBLY RH *4 INVERTER WITH CONVERTER ASSEMBLY *5 BRAKE ACTUATOR ASSEMBLY *6 OUTER MIRROR CONTROL ECU ASSEMBLY RH (w/ Seat Position Memory System
© 2016-2026 Copyright www.lexguide.net
