
Lexus ES: Parts Location
Lexus ES (XZ10) Service Manual / Engine & Hybrid System / 2gr-fks (emission Control) / Emission Control System / Parts Location
PARTS LOCATION
ILLUSTRATION
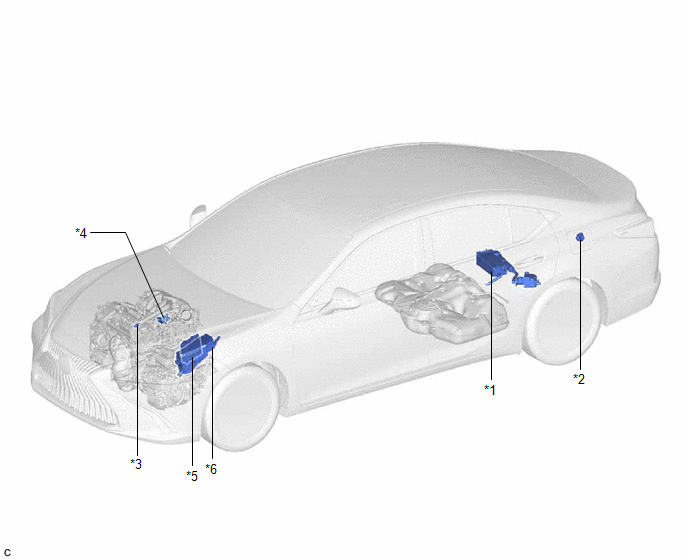
| *1 | CANISTER (CHARCOAL CANISTER ASSEMBLY) | *2 | FUEL TANK CAP ASSEMBLY |
| *3 | PCV VALVE (VENTILATION VALVE SUB-ASSEMBLY) | *4 | PURGE VALVE (PURGE VSV) |
| *5 | ECM | *6 | ENGINE ROOM RELAY BLOCK AND JUNCTION BLOCK ASSEMBLY - EFI-MAIN NO. 1 RELAY - EFI-MAIN NO. 1 FUSE - EFI NO. 1 FUSE |
READ NEXT:
 System Diagram
SYSTEM DIAGRAM *1 Purge Valve (Purge VSV) *2 Fuel Tank Cap Assembly *3 Fuel Tank Assembly *4 Canister Filter *5 Fuel Cut-off Valve *6 ECM *7 Canister Pump Module (L
On-vehicle Inspection
ON-VEHICLE INSPECTION CAUTION / NOTICE / HINT CAUTION: To prevent injury due to contact with an operating V-ribbed belt or cooling fan, keep your hands and clothing away from the V-ribbed belt and coo
Fuel Tank Cap
InspectionINSPECTION PROCEDURE 1. INSPECT FUEL TANK CAP ASSEMBLY (a) Visually check that the fuel tank cap assembly and gasket are not deformed or damaged. If the result is not as specified, repla
SEE MORE:
Panel Switches do not Function
CAUTION / NOTICE / HINT NOTICE:
Depending on the parts that are replaced during vehicle inspection or maintenance, performing initialization, registration or calibration may be needed. Refer to Precaution for Navigation System.
Click here
When replacing the radio receiver assembly, always re
Acn Call End
ACN CALL END ACN CALL END This function terminates the ACN (Automatic Collision Notification) to the telematics provider. After a collision in which the DCM receives "Collision Detection Signal", the vehicle will send the emergency call notification to the telematics provider until the emergency cal
© 2016-2026 Copyright www.lexguide.net
