
Lexus ES: On-vehicle Inspection
ON-VEHICLE INSPECTION
PROCEDURE
1. REMOVE COWL TOP VENTILATOR LOUVER SUB-ASSEMBLY
Click here 
2. REMOVE FRONT CENTER UPPER SUSPENSION BRACE SUB-ASSEMBLY
Click here
3. OPERATION CHECK
(a) Slide the clip and disconnect the air tube from the vacuum pump assembly.
| (b) Connect the hose of the vacuum gauge to the vacuum pump assembly. |
|
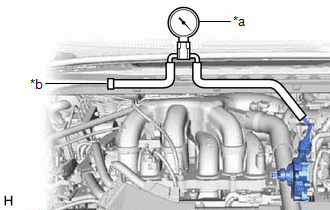
(c) Start the engine and warm it up for more than 2 minutes.
(d) With the engine idling, check the vacuum of the vacuum pump assembly.
Standard Pressure:
More than 86.7 kPa (650 mmHg, 25.6 in.Hg)
HINT:
-
If the pressure is less than the standard, disassemble and inspect the vacuum pump. If necessary, replace the vacuum pump assembly.
Click here
- Always perform this operation check procedure after replacing or servicing the vacuum pump assembly.
(e) Remove the vacuum gauge from the vacuum pump assembly.
(f) Connect the air tube to the vacuum pump assembly and slide the clip to secure it.
4. INSTALL FRONT CENTER UPPER SUSPENSION BRACE SUB-ASSEMBLY
Click here
5. INSTALL COWL TOP VENTILATOR LOUVER SUB-ASSEMBLY
Click here
READ NEXT:
 Reassembly
REASSEMBLY PROCEDURE 1. INSTALL VACUUM PUMP VANE (a) Apply engine oil to the vacuum pump vane and vacuum pump vane caps and install the vacuum pump vane caps to the vacuum pump vane. (b) Apply engine
Removal
REMOVAL PROCEDURE 1. REMOVE THROTTLE BODY WITH MOTOR ASSEMBLY Click here 2. REMOVE NO. 2 SURGE TANK STAY Click here 3. SEPARATE ENGINE WIRE (a) Remove the 2 bolts and separate the engine wire.
SEE MORE:
Reassembly
REASSEMBLY PROCEDURE 1. INSTALL LOWER POSITION INDICATOR HOUSING (a) Engage the 4 claws and 2 guides to install the lower position indicator housing to the shift lock control unit assembly. NOTICE: Do not damage the lower position indicator housing. 2. INSTALL SHIFT POSITION INDICATOR
Inspection
INSPECTION PROCEDURE 1. INSPECT REAR SPEAKER ASSEMBLY (for 10 Speakers) (a) With the speaker installed, check that there is no looseness or other abnormalities. (b) Check that there is no foreign matter in the speaker, no tears on the speaker cone or other abnormalities. (c) Measure the resistanc
