Lexus ES: Installation
INSTALLATION
PROCEDURE
1. INSTALL REAR HEIGHT CONTROL SENSOR SUB-ASSEMBLY LH
NOTICE:
If the rear height control sensor sub-assembly LH has been struck or dropped, replace it with a new one.
(a) for 2WD:
(1) Engage the 2 guides.
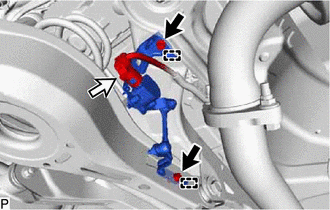
.png) | Bolt |
.png) | Connector |
(2) Install the rear height control sensor sub-assembly LH with the 2 bolts.
Torque:
12 N·m {122 kgf·cm, 9 ft·lbf}
(3) Connect the connector.
(b) for AWD:
(1) Engage the 2 guides.
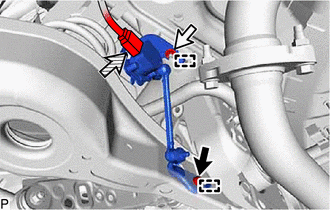
| | Bolt |
| | Nut |
.png) | Connector |
(2) Install the rear height control sensor sub-assembly LH with the bolt and nut.
Torque:
for Bolt :
12 N·m {122 kgf·cm, 106 in·lbf}
for Nut :
12 N·m {122 kgf·cm, 106 in·lbf}
(3) Connect the connector.
2. INSTALL REAR WHEEL (for LH Side)
Click here .gif)
3. PERFORM INITIALIZATION
for HV Model:
Click here
for Gasoline Model:
Click here
4. INSPECT HEADLIGHT AIMING
Click here
READ NEXT:
 High Mounted Stop Light Assembly
ComponentsCOMPONENTS ILLUSTRATION *1 CENTER STOP LIGHT SET - - RemovalREMOVAL PROCEDURE 1. REMOVE CENTER STOP LIGHT SET (a) Disengage the 4 guides as shown in the illustration. D
Components
COMPONENTS ILLUSTRATION *A for Driver Side *B for Front Passenger Side *1 COURTESY LIGHT ASSEMBLY *2 FRONT DOOR ILLUMINATION LIGHT (FRONT DOOR OUTSIDE HANDLE ASSEMBLY) *3 FRO
SEE MORE:
Control Module Performance Bank 1 Watchdog/Safety MCU Failure (P060747,P060787)
MONITOR DESCRIPTION The ECM continuously monitors its internal ICs and the monitor IC. If the monitor IC is abnormal, the ECM illuminates the MIL and stores DTC P060747. If an internal IC is abnormal, the ECM illuminates the MIL and stores DTC P060787. DTC No. Detection Item DTC Detection Con
Diagnostic Trouble Code Chart
DIAGNOSTIC TROUBLE CODE CHART Power Mirror Control System (w/ Memory) DTC No. Detection Item Link U0142 Lost Communication with Main Body ECU
