Lexus ES: Components
COMPONENTS
ILLUSTRATION
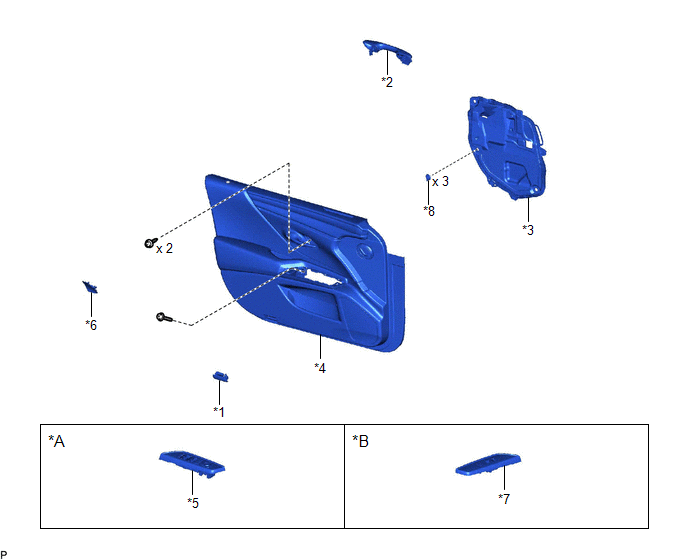
| *A | for Driver Side | *B | for Front Passenger Side |
| *1 | COURTESY LIGHT ASSEMBLY | *2 | FRONT DOOR ILLUMINATION LIGHT (FRONT DOOR OUTSIDE HANDLE ASSEMBLY) |
| *3 | FRONT DOOR SERVICE HOLE COVER | *4 | FRONT DOOR TRIM BOARD SUB-ASSEMBLY |
| *5 | MULTIPLEX NETWORK MASTER SWITCH ASSEMBLY WITH FRONT DOOR UPPER ARMREST BASE PANEL | *6 | NO. 2 DOOR TRIM PAD |
| *7 | POWER WINDOW REGULATOR SWITCH ASSEMBLY WITH FRONT DOOR UPPER ARMREST BASE PANEL | *8 | FRONT DOOR WEATHERSTRIP CLIP |
READ NEXT:
 Removal
REMOVAL CAUTION / NOTICE / HINT The necessary procedures (adjustment, calibration, initialization or registration) that must be performed after parts are removed and installed, or replaced during fron
Inspection
INSPECTION PROCEDURE 1. INSPECT FRONT DOOR ILLUMINATION LIGHT LH (FRONT DOOR OUTSIDE HANDLE ASSEMBLY LH) *a Component without harness connected (Front Door Illumination Light LH (Front Door Outs
Installation
INSTALLATION CAUTION / NOTICE / HINT HINT:
Use the same procedure for the RH side and LH side.
The following procedure is for the LH side.
PROCEDURE 1. INSTALL FRONT DOOR ILLUMINATION LIGHT (F
SEE MORE:
Distance Control Switch Circuit
DESCRIPTION The vehicle-to-vehicle distance control switch is used to set the distance for vehicle-to-vehicle distance control mode. The vehicle-to-vehicle distance control switch is installed in the steering pad switch assembly. The vehicle-to-vehicle distance set value can be changed by operating
High Beam Headlight Circuit
DESCRIPTION The headlight ECU sub-assembly controls the high beam headlights. WIRING DIAGRAM except Bulb Type Turn Signal Light (for TMMK Made) for Bulb Type Turn Signal Light (for TMMK Made) CAUTION / NOTICE / HINT NOTICE:
If the headlight ECU sub-assembly LH has been replaced, it is necessary
© 2016-2026 Copyright www.lexguide.net
