Lexus ES: Installation
Lexus ES (XZ10) Service Manual / Vehicle Exterior / Exterior Panels / Trim / Rocker Panel Moulding / Installation
INSTALLATION
CAUTION / NOTICE / HINT
HINT:
- Use the same procedure for the RH side and LH side.
- The following procedure is for the LH side.
PROCEDURE
1. INSTALL BODY ROCKER PANEL MOULDING ASSEMBLY
(a) Engage the 9 clips as shown in the illustration.
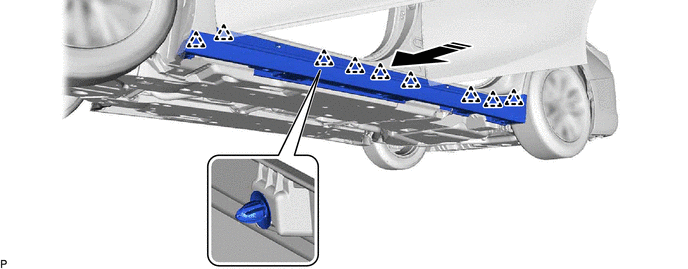
.png) | Install in this Direction | - | - |
(b) Install the grommet.
(c) Install the 6 screws.
(d) Install the body rocker panel moulding assembly with 9 new clips.
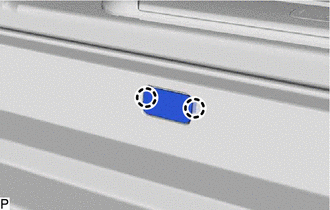
2. INSTALL ROCKER PANEL MOULDING COVER
| (a) Engage the 2 claws to install the rocker panel moulding cover. HINT: Use the same procedure for the other rocker panel moulding cover. |
|
3. INSTALL NO. 2 ROCKER PANEL MOULDING PROTECTOR
Click here .gif)
READ NEXT:
 Roof Drip Side Finish Moulding
ComponentsCOMPONENTS ILLUSTRATION *1 CENTER ROOF DRIP SIDE FINISH MOULDING *2 NO. 1 ROOF DRIP SIDE FINISH MOULDING CLIP ● Non-reusable part - - RemovalREMOVAL CAUTION / NOTI
Components
COMPONENTS ILLUSTRATION *1 NO. 1 WINDSHIELD OUTSIDE MOULDING CLIP *2 NO. 3 WINDSHIELD OUTSIDE MOULDING CLIP *3 WINDSHIELD OUTSIDE MOULDING *4 WINDSHIELD GLASS SUB-ASSEMBLY ●
SEE MORE:
Components
COMPONENTS ILLUSTRATION *A except 2GR-FKS - - *1 KICK DOOR CONTROL SENSOR *2 KICK DOOR CONTROL SENSOR WITH BRACKET *3 KICK DOOR CONTROL BRACKET - - ILLUSTRATION *A for 2GR-FKS - - *1 KICK DOOR CONTROL SENSOR *2 KICK DOOR CONTROL SENSOR WITH BRACKE
Removal
REMOVAL PROCEDURE 1. REMOVE FRONT DOOR SCUFF PLATE LH Click here 2. REMOVE COWL SIDE TRIM BOARD LH Click here 3. REMOVE FRONT DOOR OPENING TRIM COVER LH Click here 4. REMOVE INSTRUMENT SIDE PANEL LH Click here 5. REMOVE NO. 1 INSTRUMENT PANEL UNDER COVER SUB-ASSEMBLY Click here 6. REM
© 2016-2026 Copyright www.lexguide.net
