Lexus ES: Components
COMPONENTS
ILLUSTRATION
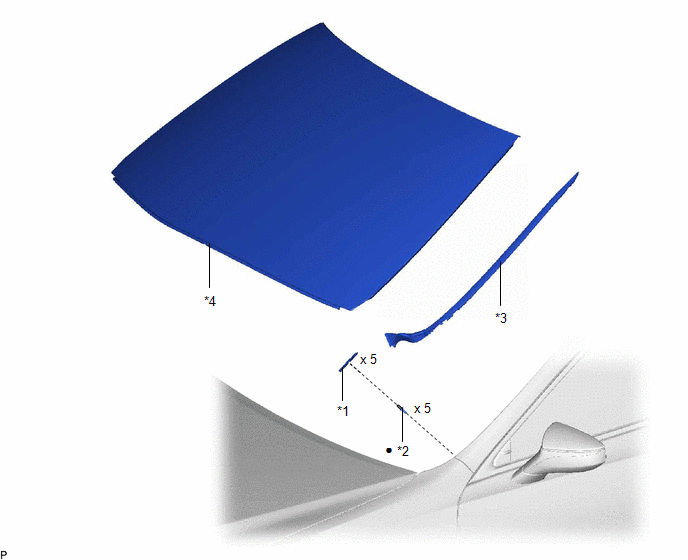
| *1 | NO. 1 WINDSHIELD OUTSIDE MOULDING CLIP | *2 | NO. 3 WINDSHIELD OUTSIDE MOULDING CLIP |
| *3 | WINDSHIELD OUTSIDE MOULDING | *4 | WINDSHIELD GLASS SUB-ASSEMBLY |
| ● | Non-reusable part | - | - |
READ NEXT:
 Removal
REMOVAL CAUTION / NOTICE / HINT HINT:
Use the same procedure for the RH side and LH side.
The following procedure is for the LH side.
PROCEDURE 1. REMOVE WINDSHIELD OUTSIDE MOULDING LH (a) App
Installation
INSTALLATION CAUTION / NOTICE / HINT HINT:
Use the same procedure for the RH side and LH side.
The following procedure is for the LH side.
PROCEDURE 1. INSTALL NO. 3 WINDSHIELD OUTSIDE MOULDIN
SEE MORE:
Hybrid/EV Battery Current/DC/DC Converter Current Signal Compare Failure (P1CFF62)
DTC SUMMARY MALFUNCTION DESCRIPTION If there is a large difference between the reactor current sensor value and the HV battery current sensor value, a malfunction will be detected. Internal inverter malfunction
Current sensor malfunction
Inverter with converter assembly internal circuit malfunc
Terminals Of Ecu
TERMINALS OF ECU CHECK AIR CONDITIONING AMPLIFIER ASSEMBLY *A w/o Seat Heater *B w/ Seat Heater (a) Disconnect the G39 air conditioning amplifier assembly connector. (b) Measure the voltage and resistance according to the value(s) in the table below. HINT: Measure the values on the wire
© 2016-2026 Copyright www.lexguide.net
