Lexus ES: Installation
INSTALLATION
CAUTION / NOTICE / HINT
HINT:
- Use the same procedure for the RH side and LH side.
- The following procedure is for the LH side.
PROCEDURE
1. INSTALL REAR DOOR WINDOW FRAME MOULDING SUB-ASSEMBLY
(a) Engage the guide to temporarily install the rear door window frame moulding sub-assembly to the door frame.
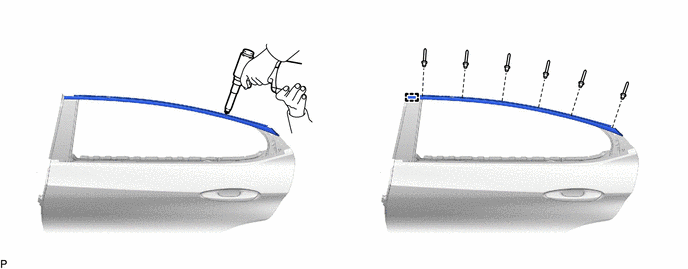
(b) Using an air riveter or hand riveter with a nose piece, install the rear door window frame moulding sub-assembly with 6 new rivets.
HINT:
If the mandrel of the rivet does not come off on the first operation of the rivet gun, slide the rivet gun forward on the mandrel and operate it again.
NOTICE:
-
Do not pry the rivet with the riveter, as this will cause damage to the riveter and mandrel.
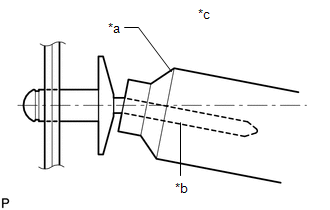
*a
Riveter
*b
Mandrel
*c
Incorrect
-
Confirm that the rivets are seated properly against the moulding.
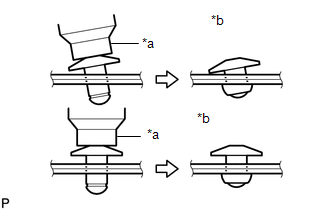
*a
Riveter
*b
Incorrect
- Do not tilt the riveter when installing the rivet to the moulding.
- Do not leave any space between the rivet head and moulding.
-
Do not leave any space between the moulding and door frame. Firmly hold the 2 items together while installing the rivet.
.png)
*a
Riveter
*b
Incorrect
2. INSTALL REAR DOOR FRONT WINDOW FRAME MOULDING
HINT:
When installing a new rear door front window frame moulding, heat the vehicle body and rear door front window frame moulding using a heat light.
Heating Temperature| Item | Temperature |
|---|---|
| Vehicle Body | 40 to 60°C (104 to 140°F) |
| Rear Door Front Window Frame Moulding | 20 to 30°C (68 to 86°F) |
CAUTION:
- Do not touch the heat light and heated parts, touching the heat light may result in burns.
- Touching heated parts for a long time may result in burns.
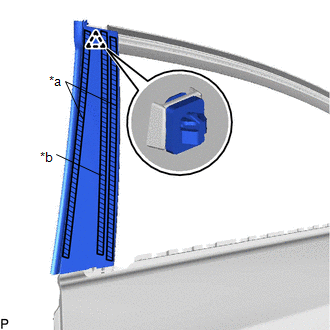
.png)
| *a | Heated Part |
| *b | Heat Light |
NOTICE:
Do not heat the vehicle body or rear door front window frame moulding excessively.
(a) Clean the vehicle body surface.
(1) Using a heat light, heat the vehicle body surface.
(2) Remove any double-sided tape from the vehicle body.
(3) Wipe off any tape adhesive residue with cleaner.
(b) Install a new rear door front window frame moulding.
(1) Using a heat light, heat the vehicle body and rear door front window frame moulding.
(2) Remove the release paper from the rear door front window frame moulding.
HINT:
After removing the release paper, keep the exposed adhesive free from foreign matter.
| (3) Engage the clip and attach the double-sided tape and caulking sponge to install the rear door front window frame moulding. HINT: Press the rear door front window frame moulding firmly to install it. |
|
3. CONNECT REAR DOOR WEATHERSTRIP
(a) Engage the 7 clips and connect the rear door weatherstrip.
4. INSTALL REAR DOOR BELT MOULDING ASSEMBLY
Click here .gif)
READ NEXT:
 Components
COMPONENTS ILLUSTRATION *A w/ Power Trunk Lid System *B for TMMK Made *1 LUGGAGE COMPARTMENT DOOR COVER *2 LUGGAGE LOCK CONTROL CABLE PLATE *3 REAR SPOILER SUB-ASSEMBLY *4
Removal
REMOVAL PROCEDURE 1. REMOVE LUGGAGE LOCK CONTROL CABLE PLATE Click here 2. REMOVE SWITCH BEZEL (w/ Power Trunk Lid System) Click here 3. REMOVE LUGGAGE COMPARTMENT DOOR COVER Click here 4. REMOV
SEE MORE:
Removal
REMOVAL CAUTION / NOTICE / HINT The necessary procedures (adjustment, calibration, initialization, or registration) that must be performed after parts are removed and installed, or replaced during engine unit removal/installation are shown below. Necessary Procedure After Parts Removed/Installed/Rep
Diagnostic Trouble Code Chart
DIAGNOSTIC TROUBLE CODE CHART HEATED STEERING WHEEL SYSTEM DTC No. Detection Item Link B14B7 Lost Communication with Steering Heater ECU
