Lexus ES: Installation
Lexus ES (XZ10) Service Manual / Vehicle Exterior / Door / Hatch / Front Door Opening Trim Weatherstrip / Installation
INSTALLATION
CAUTION / NOTICE / HINT
HINT:
- Use the same procedure for the RH side and LH side.
- The following procedure is for the LH side.
PROCEDURE
1. INSTALL FRONT DOOR OPENING TRIM WEATHERSTRIP
(a) Align the alignment mark on the front door opening trim weatherstrip with the flange on the vehicle body indicated by the arrow in the illustration, and install the front door opening trim weatherstrip.
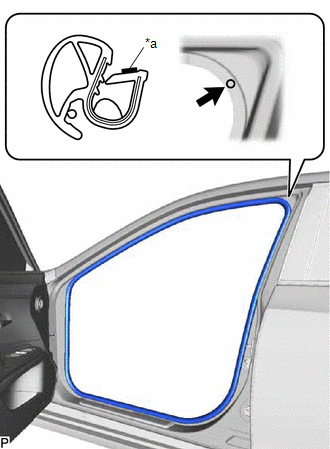
| *a | Alignment Mark |
.png) | Flange Position |
NOTICE:
- Make sure to align the alignment mark with the flange when installing the weatherstrip. If the alignment mark is not aligned, water ingress may occur.
- After installation, check that the corners fit correctly.
HINT:
- Make sure to install the part of the front door opening trim weatherstrip near the alignment mark first.
-
The color of the alignment marks on the front door opening trim weatherstrip LH and front door opening trim weatherstrip RH are different.
Alignment Mark:
Location
Color
for LH Side
Pink
for RH Side
Blue
2. INSTALL ROOF HEADLINING ASSEMBLY
Click here .gif)
READ NEXT:
 Components
COMPONENTS ILLUSTRATION *1 LUGGAGE COMPARTMENT FLOOR MAT *2 SPARE WHEEL COVER TRAY ILLUSTRATION *1 REAR FLOOR FINISH PLATE *2 LUGGAGE HOLD BELT STRIKER ASSEMBLY ILLUSTRATION
Removal
REMOVAL PROCEDURE 1. REMOVE LUGGAGE COMPARTMENT FLOOR MAT Click here 2. REMOVE SPARE WHEEL COVER TRAY Click here 3. REMOVE REAR FLOOR FINISH PLATE Click here 4. REMOVE LUGGAGE COMPARTMENT TRIM C
SEE MORE:
Installation
INSTALLATION PROCEDURE 1. INSTALL STUD BOLT HINT: If a stud bolt is deformed or its threads are damaged, replace it. (a) Using an E8 "TORX" socket wrench, install the 2 stud bolts to the exhaust manifold assembly LH (TWC: Front Catalyst). Torque: 19.5 N·m {199 kgf·cm, 14 ft·lbf} 2
Replacement
REPLACEMENT CAUTION / NOTICE / HINT HINT:
Use the same procedure for bank 1 and bank 2.
The following procedure is for bank 2.
PROCEDURE 1. REPLACE INTAKE VALVE GUIDE BUSH (a) Heat the cylinder head LH to between 80 and 100°C (176 and 212°F). (b) Place the cylinder head LH on wooden blocks
© 2016-2026 Copyright www.lexguide.net
