Lexus ES: Installation
INSTALLATION
PROCEDURE
1. TEMPORARILY INSTALL NO. 4 HV BATTERY END PLATE SUB-ASSEMBLY
CAUTION:
Be sure to wear insulated gloves.
(a) Temporarily install the No. 4 HV battery end plate sub-assembly to the HV battery with the 2 bolts and 2 nuts.
(b) Fully tighten the 2 nuts.
Torque:
19 N·m {194 kgf·cm, 14 ft·lbf}
2. INSTALL NO. 5 HV BATTERY END PLATE SUB-ASSEMBLY
CAUTION:
Be sure to wear insulated gloves.
(a) Install the No. 5 HV battery end plate sub-assembly to the HV battery with the 12 nuts.
Torque:
19 N·m {194 kgf·cm, 14 ft·lbf}
3. INSTALL NO. 4 HV BATTERY SHIELD SUB-ASSEMBLY
CAUTION:
Be sure to wear insulated gloves.
(a) Install the No.4 HV battery shield sub-assembly to the HV battery with the 4 nuts.
Torque:
19 N·m {194 kgf·cm, 14 ft·lbf}
4. INSTALL NO. 3 HV BATTERY SHIELD SUB-ASSEMBLY
CAUTION:
Be sure to wear insulated gloves.
(a) Install the No. 3 HV battery shield sub-assembly to the HV battery with the 4 nuts.
Torque:
19 N·m {194 kgf·cm, 14 ft·lbf}
5. INSTALL NO. 4 HV BATTERY END PLATE SUB-ASSEMBLY
CAUTION:
Be sure to wear insulated gloves.
(a) Fully tighten the 2 bolts.
Torque:
19 N·m {194 kgf·cm, 14 ft·lbf}
6. INSTALL HV BATTERY
CAUTION:
Be sure to wear insulated gloves.
| (a) Install the HV battery to the vehicle body with the 3 bolts (A), bolt (B) and bolt (C). Torque: 19 N·m {194 kgf·cm, 14 ft·lbf} NOTICE:
|
|

7. CONNECT FLOOR WIRE
CAUTION:
Be sure to wear insulated gloves.
(a) Connect the HV battery connector.
(b) Engage the clamp.
8. INSTALL NO. 4 HV BATTERY PROTECTOR
CAUTION:
Be sure to wear insulated gloves.
(a) Engage the clamp to install the No. 4 HV battery protector to the HV battery.
9. CONNECT FLOOR WIRE
CAUTION:
Be sure to wear insulated gloves.
(a) Engage the 2 clamps to install the floor wire to the HV battery.
10. INSTALL NO. 2 INDOOR ELECTRICAL KEY ANTENNA ASSEMBLY
Click here .gif)
11. INSTALL HYBRID BATTERY HOSE ASSEMBLY
| (a) Engage the 2 claws to install the hybrid battery hose assembly to the HV battery. |
|
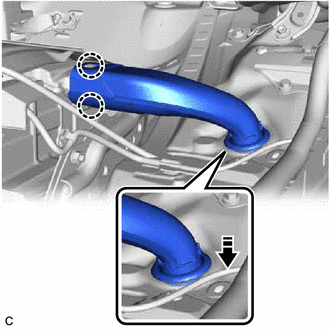
(b) Connect the hybrid battery hose assembly to the vehicle.
12. CONNECT FLOOR WIRE
CAUTION:
Be sure to wear insulated gloves.
(a) Connect the HV battery junction block assembly connector.
(b) Connect the electric vehicle battery plug assembly connector.
(c) Engage the clamp.
13. CONNECT FLOOR UNDER WIRE
CAUTION:
Be sure to wear insulated gloves.
(a) Connect the floor wire connector.
(b) Connect the shield ground to the HV battery.
(c) Connect the 2 HV battery junction block assembly connectors.
NOTICE:
Make sure that the connectors are connected securely.
14. INSTALL NO. 1 HV BATTERY COVER PANEL RH
CAUTION:
Be sure to wear insulated gloves.
| (a) Install the No. 1 HV battery cover panel RH to the HV battery with the 3 bolts and 3 nuts. Torque: 7.5 N·m {76 kgf·cm, 66 in·lbf} |
|

(b) Install the battery cover lock striker, then push the button to lock it.
15. INSTALL BATTERY COOLING BLOWER ASSEMBLY
Click here
16. INSTALL SERVICE PLUG GRIP
Click here
17. PERFORM INITIALIZATION
Click here
READ NEXT:
 Recovery Inspection
CAUTION / NOTICE / HINT CAUTION:
When disposing of an HV battery, make sure to return it through an authorized collection agent who is capable of handling it safely. If the HV battery is returned v
Discharging
DISCHARGING PROCEDURE 1. DISCHARGING (WHEN USING THE LI-ION BATTERY DISCHARGER) CAUTION: Be sure to wear insulated gloves and protective goggles. NOTICE: Make sure to observe the following points whe
SEE MORE:
How To Proceed With Troubleshooting
CAUTION / NOTICE / HINT HINT:
Use the following procedure to troubleshoot the telematics system.
*: Use the Techstream.
PROCEDURE 1. VEHICLE BROUGHT TO WORKSHOP
NEXT 2. CUSTOMER PROBLEM ANALYSIS HINT:
In troubleshooting, check that the problem symptoms h
Parking Light/Daytime Running Light Circuit
DESCRIPTION Parking light function:
When the main body ECU (multiplex network body ECU) receives the light control switch position signal, it sends an illumination request signal to the headlight ECU sub-assembly and illuminates the parking lights.
Daytime running light function:
When the o
