Lexus ES: Installation
INSTALLATION
PROCEDURE
1. INSTALL PARKING ASSIST ECU
| (a) Turn back the front floor carpet assembly as shown in the illustration. |
|
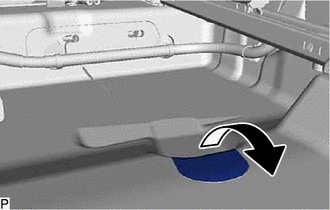
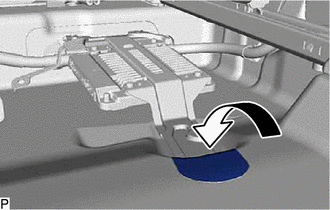
(b) Engage the 2 guides to temporarily install the parking assist ECU as shown in the illustration.

.png) | Install in this Direction (1) |
.png) | Install in this Direction (2) |
(c) Install the parking assist ECU with the bolt.
| (d) Install the front floor carpet assembly to its original position as shown in the illustration. |
|
(e) Engage the clamp.
(f) Connect each connector.
2. INSTALL PARKING ASSIST ECU COVER
(a) Install the parking assist ECU cover with the 3 clips.
3. PERFORM CALIBRATION
for HV Model: Click here .gif)
for Gasoline Model: Click here
READ NEXT:
 Removal
REMOVAL CAUTION / NOTICE / HINT The necessary procedures (adjustment, calibration, initialization, or registration) that must be performed after parts are removed and installed, or replaced during par
Black Screen
DESCRIPTION The video signal from the rear television camera assembly is transmitted to the multi-display assembly. WIRING DIAGRAM CAUTION / NOTICE / HINT NOTICE:
If the cable was disconnected fro
SEE MORE:
Dtc Check / Clear
DTC CHECK / CLEAR CHECK DTC AND FREEZE FRAME DATA (USING TECHSTREAM) (a) Turn the engine switch off. (b) Connect the Techstream to the DLC3. (c) Turn the engine switch on (IG). (d) Turn the Techstream on. (e) Enter the following menus: Chassis / Brake/EPB / Trouble Codes. Chassis > Brake/EPB >
Installation
INSTALLATION PROCEDURE 1. INSTALL REAR NO. 1 DIFFERENTIAL MOUNT CUSHION (a) Using SST, install a new rear No. 1 differential mount cushion. SST: 09316-12010 SST: 09570-24011 *1 Rear Suspension Member Sub-assembly - - *a -3° to 3° *b 9.8 to 10.8 mm (0.3858 to 0.4252 in.) *c
© 2016-2026 Copyright www.lexguide.net
