Lexus ES: Installation
Lexus ES (XZ10) Service Manual / Drivetrain / Axle And Differential / Differential Mount Cushion / Installation
INSTALLATION
PROCEDURE
1. INSTALL REAR NO. 1 DIFFERENTIAL MOUNT CUSHION
(a) Using SST, install a new rear No. 1 differential mount cushion.
SST: 09316-12010
SST: 09570-24011
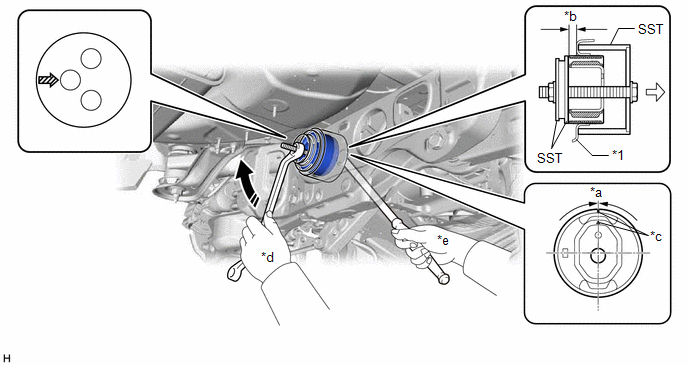
| *1 | Rear Suspension Member Sub-assembly | - | - |
| *a | -3° to 3° | *b | 9.8 to 10.8 mm (0.3858 to 0.4252 in.) |
| *c | Protrusion | *d | Turn |
| *e | Hold | - | - |
 | Turning Direction |  | Front of Vehicle |
 | SST Bolt Position | - | - |
NOTICE:
- Make sure that the rear No. 1 differential mount cushion is aligned within 3° from the center.
- Install the rear No. 1 differential mount cushion so that the protrusion is positioned as shown in the illustration.
- Be sure to use the correct combination of SST.
- Before using SST, apply grease to SST bolt.
- Temporarily install the rear No. 1 differential mount cushion to the rear suspension member sub-assembly in order to prevent it from tilting, and then install SST.
- Make sure that SST contacts the entire circumference of the rear No. 1 differential mount cushion.
- Do not tilt the SST bolt.
2. INSTALL DIFFERENTIAL CARRIER ASSEMBLY
Click here .gif)
READ NEXT:
 Removal
REMOVAL CAUTION / NOTICE / HINT The necessary procedures (adjustment, calibration, initialization, or registration) that must be performed after parts are removed and installed, or replaced during rea
Differential Oil
ComponentsCOMPONENTS ILLUSTRATION *1 REAR DIFFERENTIAL FILLER PLUG *2 REAR DIFFERENTIAL DRAIN PLUG *3 GASKET - - N*m (kgf*cm, ft.*lbf): Specified torque ● Non-reusabl
Differential System
PrecautionPRECAUTION
Before disassembling the differential assembly, thoroughly clean it by removing any sand, mud or foreign matter. This will help prevent contamination during disassembly and re
SEE MORE:
Removal
REMOVAL PROCEDURE 1. REMOVE INSTRUMENT CLUSTER FINISH PANEL ASSEMBLY Click here 2. REMOVE DRIVE MODE SELECT SWITCH (COMBINATION SWITCH ASSEMBLY) (a) Disconnect the drive mode select switch (combination switch assembly) connector. (b) Disengage the clamp to disconnect the wire harne
Pressure Control Solenoid "L" Circuit Short to Ground or Open (P08BA14)
DESCRIPTION Refer to DTC P08BA12. Click here DTC No. Detection Item DTC Detection Condition Trouble Area MIL Memory Note P08BA14 Pressure Control Solenoid "L" Circuit Short to Ground or Open While the vehicle is being driven so that gear changes occur, a short to ground or o
© 2016-2026 Copyright www.lexguide.net
