Lexus ES: Inspection
INSPECTION
PROCEDURE
1. INSPECT LEVEL WARNING SWITCH ASSEMBLY
HINT:
This check should be performed with the level warning switch assembly installed to the washer jar.
| (a) Fill the washer jar with washer fluid. |
|
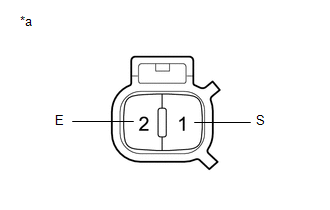
(b) Measure the resistance according to the value(s) in the table below.
Standard Resistance:
| Tester Connection | Condition | Specified Condition |
|---|---|---|
| 1 (S) - 2 (E) | Fluid volume is 600 to 800 cc (36.6 to 48.8 cu. in.) or higher* | 10 kΩ or higher |
| Fluid volume is 600 to 800 cc (36.6 to 48.8 cu. in.) or lower* | Below 1 Ω |
HINT:
*: The level warning switch assembly begins operating when the fluid volume is 600 to 800 cc (36.6 to 48.8 cu. in.) depending on the vehicle condition.
If the result is not as specified, replace the level warning switch assembly.
READ NEXT:
 Installation
INSTALLATION PROCEDURE 1. INSTALL LEVEL WARNING SWITCH ASSEMBLY (a) Install the level warning switch assembly as shown in the illustration. *a Protrusion *b Marking Install in this
Components
COMPONENTS ILLUSTRATION *1 FRONT FENDER LINER RETAINER *2 FRONT WHEEL OPENING EXTENSION PAD RH *3 PIN HOLD CLIP *4 REAR FENDER SPLASH SHIELD SUB-ASSEMBLY RH *5 WINDSHIELD WAS
SEE MORE:
Installation
INSTALLATION PROCEDURE 1. INSTALL LUGGAGE DOOR OPENING CANCEL SWITCH ASSEMBLY (a) Engage the 2 claws to install the luggage door opening cancel switch assembly as shown in the illustration. Install in this Direction 2. INSTALL GLOVE COMPARTMENT DOOR ASSEMBLY Click here 3. INSTALL LOWER
Operation Check
OPERATION CHECK CHECK ELECTRICAL REMOTE CONTROL MIRROR FUNCTION (a) Turn the engine switch on (IG). (b) With L on the mirror select switch selected, check that the outer rear view mirror assembly LH surface moves up, down, left and right normally. (c) With R on the mirror select switch selected, che
