Lexus ES: Repair
REPAIR
PROCEDURE
1. REPAIR EXHAUST VALVE SEAT
NOTICE:
- While repairing the exhaust valve seat, make sure to constantly check the valve seat width and valve seating position.
- Release the cutter gradually to make the exhaust valve seat smooth.
(a) Using 45° cutters, correct the exhaust valve seat so that the exhaust valve contacts the entire circumference of the exhaust valve seat. The contact should be in the center of the exhaust valve seat, and the exhaust valve seat width should be as specified around the entire circumference of the exhaust valve seat.
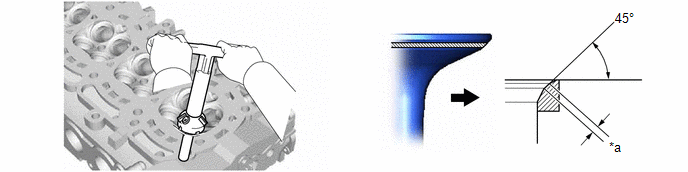
| *a | Width | - | - |
Standard Width:
1.3 to 1.7 mm (0.0512 to 0.0669 in.)
(b) Hand lap the exhaust valve and exhaust valve seat with an abrasive compound.
(c) Check the exhaust valve seating position.
READ NEXT:
 Drive Belt
ComponentsCOMPONENTS ILLUSTRATION *1 NO. 2 ENGINE UNDER COVER ASSEMBLY *2 V-RIBBED BELT *3 FRONT WHEEL OPENING EXTENSION PAD LH *4 FRONT WHEEL OPENING EXTENSION PAD RH *5 NO
On-vehicle Inspection
ON-VEHICLE INSPECTION CAUTION / NOTICE / HINT CAUTION: To prevent injury due to contact with an operating V-ribbed belt or cooling fan, keep your hands and clothing away from the V-ribbed belt and coo
SEE MORE:
Installation
INSTALLATION PROCEDURE 1. INSTALL LOWER RADIATOR SUPPORT (a) Install the 2 lower radiator supports to the radiator assembly. 2. INSTALL RADIATOR SUPPORT CUSHION (a) Install the 2 radiator support cushions to the radiator assembly. 3. INSTALL RADIATOR ASSEMBLY (a) Engage the 2 guides. (b) Engage the
Open in One Side of Bus 1 Branch Line
DESCRIPTION When the CAN bus main lines are normal (no open, short to ground, short to +B or short between lines) and there is an ECU or sensor on the "Communication Bus Check" screen that is indicated as not communicating or whose connection status on the "Communication Bus Check" screen changes in
© 2016-2026 Copyright www.lexguide.net
