Lexus ES: Installation
Lexus ES (XZ10) Service Manual / Vehicle Interior / Wiper / Washer / Washer Level Warning Switch / Installation
INSTALLATION
PROCEDURE
1. INSTALL LEVEL WARNING SWITCH ASSEMBLY
(a) Install the level warning switch assembly as shown in the illustration.
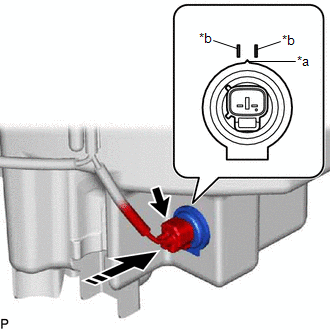
| *a | Protrusion |
| *b | Marking |
.png) | Install in this Direction |
NOTICE:
Make sure that the protrusion of the level warning switch is between the 2 markings.
(b) Connect the connector.
2. ADD WASHER FLUID
Click here .gif)
3. INSTALL FRONT BUMPER ASSEMBLY
Click here
READ NEXT:
 Components
COMPONENTS ILLUSTRATION *1 FRONT FENDER LINER RETAINER *2 FRONT WHEEL OPENING EXTENSION PAD RH *3 PIN HOLD CLIP *4 REAR FENDER SPLASH SHIELD SUB-ASSEMBLY RH *5 WINDSHIELD WAS
Removal
REMOVAL PROCEDURE 1. REMOVE FRONT WHEEL RH Click here 2. REMOVE FRONT WHEEL OPENING EXTENSION PAD RH (a) Remove the 3 screws and front wheel opening extension pad RH. 3. REMOVE REAR F
SEE MORE:
Installation
INSTALLATION PROCEDURE 1. INSTALL TURN SIGNAL SWITCH (a) Engage the claw as shown in the illustration. Install in this Direction (b) Install the turn signal switch with the 2 screws. 2. INSTALL UPPER STEERING COLUMN COVER Click here 3. INSTALL LOWER STEERING COLUMN COVER SUB-ASSEMBLY Cli
Disassembly
DISASSEMBLY CAUTION / NOTICE / HINT NOTICE: Before installation of each part, thoroughly clean and dry it. Then apply grease or oil as necessary. Do not use alkaline chemicals to clean aluminum parts, rubber parts or precoated bolts. Also, do not use non-residue solvent or other cleaning oils to cle
© 2016-2026 Copyright www.lexguide.net
