
Lexus ES: Inspection
INSPECTION
PROCEDURE
1. INSPECT REAR COMBINATION LIGHT LENS AND BODY LH (for TMC Made)
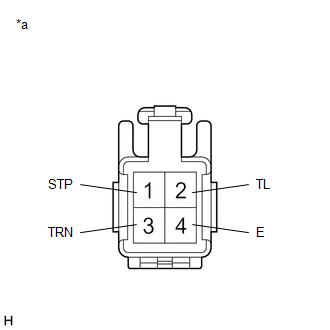
| *a | Component without harness connected (Rear Combination Light Lens and Body LH) |
(a) Apply auxiliary battery voltage to the rear combination light lens and body LH and check that the lights illuminate.
OK:
| Condition | Specified Condition |
|---|---|
| Auxiliary battery positive (+) → Terminal 2 (TL) Auxiliary battery negative (-) → Terminal 4 (E) | Taillight and side marker light illuminate |
| Auxiliary battery positive (+) → Terminal 1 (STP) Auxiliary battery negative (-) → Terminal 4 (E) | Stop light illuminates |
| Auxiliary battery positive (+) → Terminal 3 (TRN) Auxiliary battery negative (-) → Terminal 4 (E) | Turn signal light illuminates |
If the result is not as specified, replace the rear combination light lens and body LH.
2. INSPECT REAR COMBINATION LIGHT LENS AND BODY RH (for TMC Made)
| *a | Component without harness connected (Rear Combination Light Lens and Body RH) |
(a) Apply auxiliary battery voltage to the rear combination light lens and body RH and check that the lights illuminate.
OK:
| Condition | Specified Condition |
|---|---|
| Auxiliary battery positive (+) → Terminal 2 (TL) Auxiliary battery negative (-) → Terminal 4 (E) | Taillight and side marker light illuminate |
| Auxiliary battery positive (+) → Terminal 1 (STP) Auxiliary battery negative (-) → Terminal 4 (E) | Stop light illuminates |
| Auxiliary battery positive (+) → Terminal 3 (TRN) Auxiliary battery negative (-) → Terminal 4 (E) | Turn signal light illuminates |
If the result is not as specified, replace the rear combination light lens and body RH.
3. INSPECT REAR COMBINATION LIGHT ASSEMBLY LH (for TMMK Made)
| *a | Component without harness connected (Rear Combination Light Assembly LH) |
(a) Apply auxiliary battery voltage to the rear combination light assembly LH and check that the lights illuminate.
OK:
| Condition | Specified Condition |
|---|---|
| Auxiliary battery positive (+) → Terminal 2 (TL) Auxiliary battery negative (-) → Terminal 4 (E) | Taillight and side marker light illuminate |
| Auxiliary battery positive (+) → Terminal 1 (STP) Auxiliary battery negative (-) → Terminal 4 (E) | Stop light illuminates |
| Auxiliary battery positive (+) → Terminal 3 (TRN) Auxiliary battery negative (-) → Terminal 4 (E) | Turn signal light illuminates |
If the result is not as specified, replace the rear combination light assembly LH.
4. INSPECT REAR COMBINATION LIGHT ASSEMBLY RH (for TMMK Made)
| *a | Component without harness connected (Rear Combination Light Assembly RH) |
(a) Apply auxiliary battery voltage to the rear combination light assembly RH and check that the lights illuminate.
OK:
| Condition | Specified Condition |
|---|---|
| Auxiliary battery positive (+) → Terminal 2 (TL) Auxiliary battery negative (-) → Terminal 4 (E) | Taillight and side marker light illuminate |
| Auxiliary battery positive (+) → Terminal 1 (STP) Auxiliary battery negative (-) → Terminal 4 (E) | Stop light illuminates |
| Auxiliary battery positive (+) → Terminal 3 (TRN) Auxiliary battery negative (-) → Terminal 4 (E) | Turn signal light illuminates |
If the result is not as specified, replace the rear combination light assembly RH.
READ NEXT:
 Installation
INSTALLATION CAUTION / NOTICE / HINT HINT:
Use the same procedure for the RH side and LH side.
The following procedure is for the LH side.
PROCEDURE 1. INSTALL REAR COMBINATION LIGHT ASSEMBLY
Components
COMPONENTS ILLUSTRATION *A w/ Power Trunk Lid System - - *1 LUGGAGE COMPARTMENT DOOR COVER *2 LUGGAGE LOCK CONTROL CABLE PLATE *3 SWITCH BEZEL - - ILLUSTRATION *1
SEE MORE:
Parts Location
PARTS LOCATION ILLUSTRATION *1 FRONT ENGINE MOUNTING INSULATOR *2 REAR ENGINE MOUNTING INSULATOR *3 CANISTER *4 FUEL PUMP (for Low Pressure Side) *5 MASS AIR FLOW METER SUB-ASSEMBLY *6 PARK / NEUTRAL POSITION SWITCH ASSEMBLY *7 VACUUM SWITCHING VALVE (for Active C
Installation
INSTALLATION PROCEDURE 1. PRECAUTION NOTICE: After turning the engine switch (for Gasoline Model) or power switch (for HV Model) off, waiting time may be required before disconnecting the cable from the negative (-) auxiliary battery terminal. Therefore, make sure to read the disconnecting the cable
