
Lexus ES: Inspection
INSPECTION
PROCEDURE
1. INSPECT HAZARD WARNING SIGNAL SWITCH ASSEMBLY
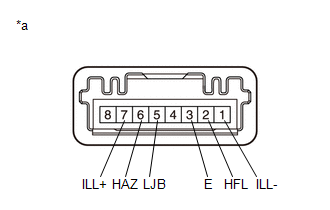
| *a | Component without harness connected (Hazard Warning Signal Switch Assembly) |
(a) Measure the resistance according to the value(s) in the table below.
Standard Resistance:
| Tester Connection | Condition | Specified Condition |
|---|---|---|
| 6 (HAZ) - 3 (E) | Hazard warning switch off | 10 kΩ or higher |
| Hazard warning switch on | Below 1 Ω |
If the result is not as specified, replace the hazard warning signal switch assembly.
(b) Apply auxiliary battery voltage to the hazard warning signal switch assembly and check that the switch illuminates.
OK:
Switch Illumination| Measurement Condition | Condition | Specified Condition |
|---|---|---|
| Auxiliary battery positive (+) → Terminal 7 (ILL+) Auxiliary battery negative (-) → Terminal 1 (ILL-) | Always | Switch illumination illuminates |
OK:
Switch Indicator| Measurement Condition | Condition | Specified Condition |
|---|---|---|
| Auxiliary battery positive (+) → Terminal 2 (HFL) Auxiliary battery negative (-) → Terminal 5 (LJB) | Always | Switch indicator illuminates |
If the result is not as specified, replace the hazard warning signal switch assembly.
READ NEXT:
 Installation
INSTALLATION PROCEDURE 1. INSTALL HAZARD WARNING SIGNAL SWITCH ASSEMBLY (a) Engage the 2 claws to install the hazard warning signal switch assembly. Install in this Direction 2. INSTALL NO.
Components
COMPONENTS ILLUSTRATION *1 COWL TOP PANEL INSULATOR *2 FRONT FENDER SPLASH SHIELD SUB-ASSEMBLY *3 HEADLIGHT ASSEMBLY - - N*m (kgf*cm, ft.*lbf): Specified torque - - I
SEE MORE:
EVAP System Tank Vapor Line Restricted/Blocked (P00FE00)
DTC SUMMARY DTC No. Detection Item DTC Detection Condition Trouble Area MIL Memory Note P00FE00 EVAP System Tank Vapor Line Restricted/Blocked Leak detection pump creates negative pressure (vacuum) in EVAP system and EVAP system pressure is measured. When the fuel level in the
Removal
REMOVAL PROCEDURE 1. REMOVE NO. 1 INSTRUMENT PANEL UNDER COVER SUB-ASSEMBLY Click here 2. REMOVE ACCELERATOR PEDAL(W/SENSOR) ROD ASSEMBLY NOTICE:
Avoid physical shock to the accelerator pedal sensor assembly.
Do not disassemble the accelerator pedal sensor assembly.
The accelerator pedal s
