Lexus ES: High Beam Headlight Circuit
DESCRIPTION
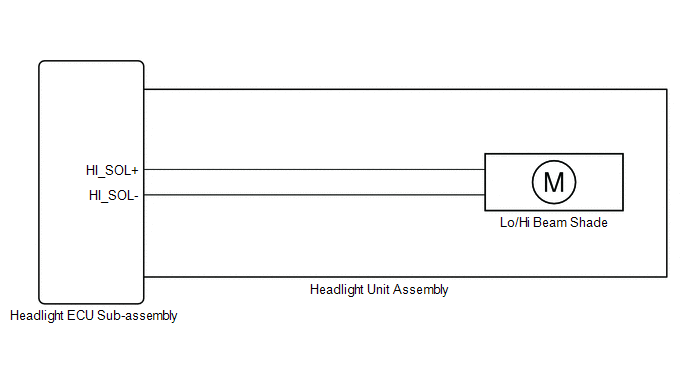
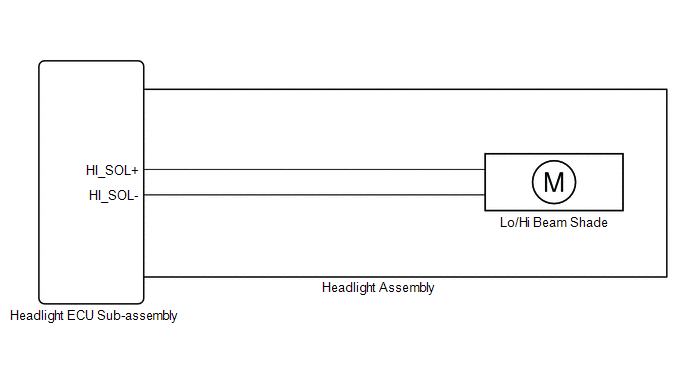
The headlight ECU sub-assembly controls the high beam headlights.
WIRING DIAGRAM
except Bulb Type Turn Signal Light (for TMMK Made)
for Bulb Type Turn Signal Light (for TMMK Made)
CAUTION / NOTICE / HINT
NOTICE:
-
If the headlight ECU sub-assembly LH has been replaced, it is necessary to synchronize the vehicle information and initialize the headlight ECU sub-assembly LH.*1
Click here
.gif)
-
If the headlight ECU sub-assembly LH has been replaced, it is necessary to synchronize the vehicle information the headlight ECU sub-assembly LH.*2
Click here
-
If the headlight assembly LH has been replaced, it is necessary to synchronize the vehicle information the headlight ECU sub-assembly LH.*3
Click here
-
When replacing the headlight ECU sub-assembly LH, always replace it with a new one. If a headlight ECU sub-assembly LH which was installed to another vehicle is used, the information stored in it will not match the information from the vehicle and a DTC may be stored.
- *1: for LED Type Turn Signal Light
- *2: for Bulb Type Turn Signal Light
- *3: for Bulb Type Turn Signal Light (for TMMK Made)
PROCEDURE
| 1. | CONFIRM MODEL |
(a) Choose the model to be inspected.
| Result | Proceed to |
|---|---|
| for LED Type Turn Signal Light | A |
| for Bulb Type Turn Signal Light | B |
| B | .gif) | GO TO STEP 5 |
|
.gif)
| 2. | CHECK LIGHTS |
(a) Check the illumination of each high beam lights.
| Result | Proceed to |
|---|---|
| LH side high beam light does not illuminate | A |
| RH side high beam light does not illuminate | B |
| B | | GO TO STEP 4 |
|
| 3. | PERFORM ACTIVE TEST USING TECHSTREAM |
(a) Connect the Techstream to the DLC3.
(b) Turn the engine switch on (IG).
(c) Turn the Techstream on.
(d) Enter the following menus: Body Electrical / AFS / Active Test.
(e) Perform the Active Test according to the display on the Techstream.
Body Electrical > AFS > Active Test| Tester Display | Measurement Item | Control Range | Diagnostic Note |
|---|---|---|---|
| Headlight High Beam | High beam headlights | OFF or ON | - |
| Tester Display |
|---|
| Headlight High Beam |
OK:
High beam headlight turn on.
| OK | | PROCEED TO NEXT SUSPECTED AREA SHOWN IN PROBLEM SYMPTOMS TABLE |
| NG | | GO TO STEP 7 |
| 4. | PERFORM ACTIVE TEST USING TECHSTREAM |
(a) Connect the Techstream to the DLC3.
(b) Turn the engine switch on (IG).
(c) Turn the Techstream on.
(d) Enter the following menus: Body Electrical / AFS (Sub) / Active Test.
(e) Perform the Active Test according to the display on the Techstream.
Body Electrical > AFS (Sub) > Active Test| Tester Display | Measurement Item | Control Range | Diagnostic Note |
|---|---|---|---|
| Headlight High Beam | High beam headlights | OFF or ON | - |
| Tester Display |
|---|
| Headlight High Beam |
OK:
High beam headlight turn on.
| OK | | PROCEED TO NEXT SUSPECTED AREA SHOWN IN PROBLEM SYMPTOMS TABLE |
| NG | | GO TO STEP 12 |
| 5. | CHECK LIGHTS |
(a) Check the illumination of each high beam lights.
| Result | Proceed to |
|---|---|
| LH side high beam light does not illuminate | A |
| RH side high beam light does not illuminate | B |
| B | | GO TO STEP 11 |
|
| 6. | PERFORM ACTIVE TEST USING TECHSTREAM |
(a) Connect the Techstream to the DLC3.
(b) Turn the engine switch on (IG).
(c) Turn the Techstream on.
(d) Enter the following menus: Body Electrical / HL AutoLeveling / Active Test.
(e) Perform the Active Test according to the display on the Techstream.
Body Electrical > HL AutoLeveling > Active Test| Tester Display | Measurement Item | Control Range | Diagnostic Note |
|---|---|---|---|
| Headlight High Beam | High beam headlights | OFF or ON | - |
| Tester Display |
|---|
| Headlight High Beam |
OK:
High beam headlight turn on.
| Result | Proceed to |
|---|---|
| OK | A |
| NG (for TMC Made) | B |
| NG (for TMMK Made) | C |
| A | | PROCEED TO NEXT SUSPECTED AREA SHOWN IN PROBLEM SYMPTOMS TABLE |
| C | | GO TO STEP 9 |
|
| 7. | CHECK HEADLIGHT UNIT ASSEMBLY LH |
(a) Interchange the headlight unit assembly LH with RH and connect the connectors.
for LED Type Turn Signal Light: Click here
for Bulb Type Turn Signal Light: Click here
|
| 8. | CHECK OPERATION (HIGH BEAM HEADLIGHT) |
(a) Check that the high beam headlight operates normally.
OK:
High beam headlight operates normally.
| OK | | REPLACE HEADLIGHT ECU SUB-ASSEMBLY LH |
| NG | | REPLACE HEADLIGHT UNIT ASSEMBLY LH |
| 9. | CHECK HEADLIGHT ASSEMBLY LH |
(a) Remove each headlight ECU sub-assembly, interchange the headlight assembly LH with RH and connect the connectors.
Click here
|
| 10. | CHECK OPERATION (HIGH BEAM HEADLIGHT) |
(a) Check that the high beam headlight operates normally.
OK:
High beam headlight operates normally.
| OK | | REPLACE HEADLIGHT ECU SUB-ASSEMBLY LH |
| NG | | REPLACE HEADLIGHT ASSEMBLY LH |
| 11. | PERFORM ACTIVE TEST USING TECHSTREAM |
(a) Connect the Techstream to the DLC3.
(b) Turn the engine switch on (IG).
(c) Turn the Techstream on.
(d) Enter the following menus: Body Electrical / HL AutoLeveling (Sub) / Active Test.
(e) Perform the Active Test according to the display on the Techstream.
Body Electrical > HL AutoLeveling (Sub) > Active Test| Tester Display | Measurement Item | Control Range | Diagnostic Note |
|---|---|---|---|
| Headlight High Beam | High beam headlights | OFF or ON | - |
| Tester Display |
|---|
| Headlight High Beam |
OK:
High beam headlight turn on.
| Result | Proceed to |
|---|---|
| OK | A |
| NG (for TMC Made) | B |
| NG (for TMMK Made) | C |
| A | | PROCEED TO NEXT SUSPECTED AREA SHOWN IN PROBLEM SYMPTOMS TABLE |
| C | | GO TO STEP 14 |
|
| 12. | CHECK HEADLIGHT UNIT ASSEMBLY RH |
(a) Interchange the headlight unit assembly RH with LH and connect the connectors.
for LED Type Turn Signal Light: Click here
for Bulb Type Turn Signal Light: Click here
|
| 13. | CHECK OPERATION (HIGH BEAM HEADLIGHT) |
(a) Check that the high beam headlight operates normally.
OK:
High beam headlight operates normally.
| OK | | REPLACE HEADLIGHT ECU SUB-ASSEMBLY RH |
| NG | | REPLACE HEADLIGHT UNIT ASSEMBLY RH |
| 14. | CHECK HEADLIGHT ASSEMBLY RH |
(a) Remove each headlight ECU sub-assembly, interchange the headlight assembly RH with LH and connect the connectors.
Click here
|
| 15. | CHECK OPERATION (HIGH BEAM HEADLIGHT) |
(a) Check that the high beam headlight operates normally.
OK:
High beam headlight operates normally.
| OK | | REPLACE HEADLIGHT ECU SUB-ASSEMBLY RH |
| NG | | REPLACE HEADLIGHT ASSEMBLY RH |
READ NEXT:
 Precaution
PRECAUTION PRECAUTION FOR DISCONNECTING CABLE FROM NEGATIVE AUXILIARY BATTERY TERMINAL NOTICE: When disconnecting the cable from the negative (-) auxiliary battery terminal, initialize the following s
Parts Location
PARTS LOCATION ILLUSTRATION *1 SIDE TURN SIGNAL LIGHT ASSEMBLY LH *2 SIDE TURN SIGNAL LIGHT ASSEMBLY RH *3 HEADLIGHT ASSEMBLY LH - HEADLIGHT ECU SUB-ASSEMBLY LH - HEADLIGHT UNIT ASSEMB
SEE MORE:
Remote Touch Screen Does not Generate Vibration Feedback
DESCRIPTION When each button displayed on the multi-display assembly is selected via remote touch screen operation, the remote touch screen generates vibration feedback according to communication between the remote touch and radio receiver assembly. CAUTION / NOTICE / HINT NOTICE:
Depending on th
Installation
INSTALLATION PROCEDURE 1. ALIGN FRONT WHEELS FACING STRAIGHT AHEAD 2. INSTALL STEERING COLUMN ASSEMBLY NOTICE: Make sure that the wire harness is not interfering with the steering column assembly. (a) Install the steering column assembly with the bolt and 2 nuts. Torque: 36 N·m {367 kgf·cm, 27 ft
