Lexus ES: Disassembly
DISASSEMBLY
CAUTION / NOTICE / HINT
HINT:
- Use the same procedure for the RH side and LH side.
- The following procedure is for the LH side.
PROCEDURE
1. REMOVE HEADLIGHT ECU SUB-ASSEMBLY
Click here .gif)
2. REMOVE HEADLIGHT GASKET
Click here
3. REMOVE HEADLIGHT RIM
| (a) Remove the screw. |
|
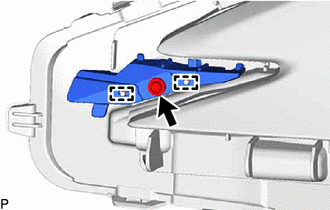
(b) Disengage the 2 guides to remove the headlight rim.
4. REMOVE NO. 2 HEADLIGHT FITTING RIM
| (a) Remove the 2 screws. |
|
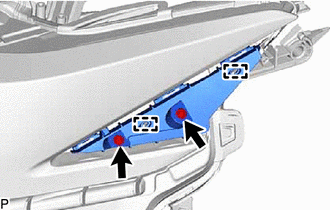
(b) Disengage the 2 guides to remove the No. 2 headlight fitting rim.
5. REMOVE HEADLIGHT UNIT ASSEMBLY
6. REMOVE HEADLIGHT SEAL (for TMC Made)
HINT:
Perform this procedure only when replacement of the headlight seal is necessary.
| (a) Remove the headlight seal. NOTICE: The headlight seal cannot be reused. |
|

READ NEXT:
 Adjustment
ADJUSTMENT CAUTION / NOTICE / HINT HINT:
Use the same procedure for the RH side and LH side.
The following procedure is for the LH side.
PROCEDURE 1. PREPARE VEHICLE FOR HEADLIGHT AIM ADJUSTME
Reassembly
REASSEMBLY CAUTION / NOTICE / HINT HINT:
Use the same procedure for the RH side and LH side.
The following procedure is for the LH side.
PROCEDURE 1. INSTALL HEADLIGHT SEAL (for TMC Made) HINT
Installation
INSTALLATION CAUTION / NOTICE / HINT HINT:
Use the same procedure for the RH side and LH side.
The following procedure is for the LH side.
PROCEDURE 1. INSTALL HEADLIGHT ASSEMBLY (a) Connect t
SEE MORE:
"B" Camshaft Position Actuator Bank 1 General Electrical Failure (P136201)
DESCRIPTION Refer to DTC P001001. Click here DTC No. Detection Item DTC Detection Condition Trouble Area MIL Memory Note P136201 "B" Camshaft Position Actuator Bank 1 General Electrical Failure While engine is running, malfunction in rotation direction signal (VTD) of cam ti
Precaution
PRECAUTION PRECAUTION FOR DISCONNECTING CABLE FROM NEGATIVE AUXILIARY BATTERY TERMINAL NOTICE: When disconnecting the cable from the negative (-) auxiliary battery terminal, initialize the following system(s) after the cable is reconnected: System See Procedure Lane Control System (for HV M
© 2016-2026 Copyright www.lexguide.net
