Lexus ES: Installation
INSTALLATION
CAUTION / NOTICE / HINT
HINT:
- Use the same procedure for the RH side and LH side.
- The following procedure is for the LH side.
PROCEDURE
1. INSTALL HEADLIGHT ASSEMBLY
(a) Connect the connector and raise the connector lock lever to engage the claw and lock the connector as shown in the illustration.
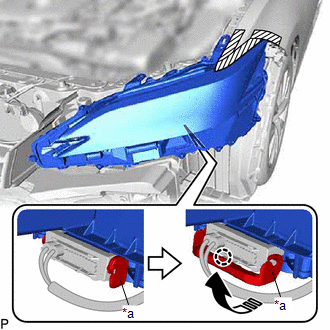
| *a | Connector Lock Lever |
.png) | Connect in this Direction |
(b) Engage the 2 guides to temporarily install the headlight assembly as shown in the illustration.
| | Install in this Direction |
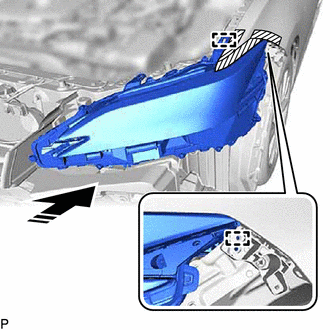
| (c) Install the headlight assembly with the 2 bolts and 3 screws. Torque: Bolt : 5.4 N·m {55 kgf·cm, 48 in·lbf} |
|
.png)
(d) Remove the protective tape.
2. INSTALL FRONT FENDER SPLASH SHIELD SUB-ASSEMBLY
Click here .gif)
3. INSTALL COWL TOP PANEL INSULATOR
Click here
4. INSTALL FRONT BUMPER ASSEMBLY
Click here
5. PERFORM INITIALIZATION
for HV Model:
Click here
for Gasoline Model:
Click here
6. ADJUST HEADLIGHT AIMING
Click here
READ NEXT:
 Repair
REPAIR CAUTION / NOTICE / HINT HINT:
Use the same procedure for the RH side and LH side.
The following procedure is for the LH side.
If the installation area of the headlight assembly is damage
Components
COMPONENTS ILLUSTRATION *1 LOWER STEERING COLUMN COVER SUB-ASSEMBLY *2 TURN SIGNAL SWITCH *3 UPPER STEERING COLUMN COVER - -
SEE MORE:
Stop Lamp Relay Actuator Stuck Off (C13807F)
DESCRIPTION Refer to DTC C13807E. Click here DTC No. Detection Item DTC Detection Condition Trouble Area C13807F Stop Lamp Relay Actuator Stuck Off When the voltage at the +BS terminal is between 10 V or more and the stop light control relay (stop light switch assembly) drive outp
Reassembly
REASSEMBLY CAUTION / NOTICE / HINT HINT:
Use the same procedure for the RH side and LH side.
The following procedure is for the LH side.
PROCEDURE 1. INSTALL VISOR COVER ASSEMBLY Click here 2. INSTALL OUTER MIRROR UPPER COVER Click here 3. INSTALL OUTER MIRROR LOWER COVER Click here 4.
