Lexus ES: Disassembly
Lexus ES (XZ10) Service Manual / Vehicle Interior / Exterior Panels / Trim / Grille Shutter / Disassembly
DISASSEMBLY
PROCEDURE
1. REMOVE MOTOR COVER
| (a) Disconnect the connector. |
|
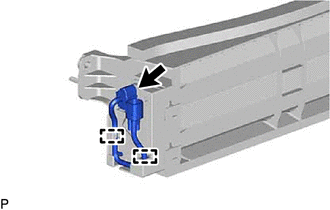
(b) Disengage the 2 clamps.
(c) Disengage the 4 claws to remove the motor cover as shown in the illustration.
.png) | Remove in this Direction |
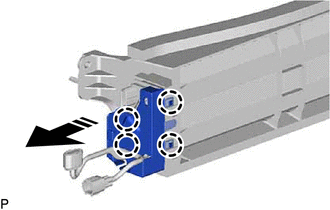
2. REMOVE SWING GRILLE ACTUATOR ASSEMBLY
(a) Remove the swing grille actuator assembly as shown in the illustration.

| | Remove in this Direction |
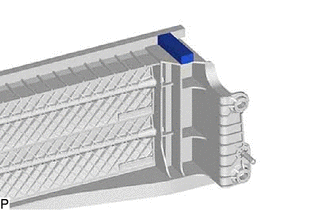
3. REMOVE NO. 3 RADIATOR GRILLE SEAL
| (a) Remove the No. 3 radiator grille seal. HINT: Use the same procedure for the RH side and LH side. |
|
4. REMOVE NO. 1 RADIATOR GRILLE SEAL
| (a) Remove the No. 1 radiator grille seal. |
|
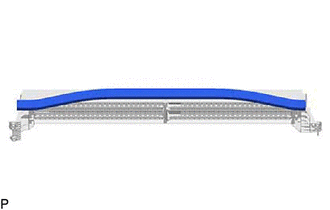
5. REMOVE NO. 2 RADIATOR GRILLE SEAL
| (a) Remove the No. 2 radiator grille seal. |
|
READ NEXT:
 Reassembly
REASSEMBLY PROCEDURE 1. INSTALL NO. 2 RADIATOR GRILLE SEAL HINT: When installing the No. 2 radiator grille seal, heat the radiator shutter using a heat light. Heating Temperature Item Temperature
Installation
INSTALLATION PROCEDURE 1. INSTALL RADIATOR SHUTTER SUB-ASSEMBLY (a) Engage the 2 guides as shown in the illustration. Install in this Direction (b) Install the radiator shutter sub-assembly
SEE MORE:
Idle Control System (P050500)
DESCRIPTION The idle speed is controlled by the electronic throttle control system. The electronic throttle control system is comprised of: 1) one valve type throttle body with motor assembly; 2) the throttle actuator, which operates the throttle valve; 3) the throttle position sensor, which detects
Driver Seat Control ECU Communication Stop Mode
DESCRIPTION Detection Item Symptom Trouble Area Driver Seat Control ECU Communication Stop Mode Any of the following conditions are met:
Communication stop for "D-Seat" is indicated on the "Communication Bus Check" screen of the Techstream.
Click here
Communication stop history
© 2016-2026 Copyright www.lexguide.net
