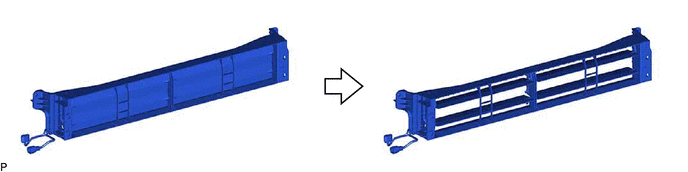
Lexus ES: Reassembly
REASSEMBLY
PROCEDURE
1. INSTALL NO. 2 RADIATOR GRILLE SEAL
HINT:
When installing the No. 2 radiator grille seal, heat the radiator shutter using a heat light.
Heating Temperature| Item | Temperature |
|---|---|
| Radiator Shutter | 20 to 30°C (68 to 86°F) |
CAUTION:
- Do not touch the heat light and heated parts, touching the heat light may result in burns.
- Touching heated parts for a long time may result in burns.
.png)
| *a | Heated Part |
| *b | Heat Light |
NOTICE:
Do not heat the radiator shutter excessively.
(a) Clean the radiator shutter surface.
(1) Using a heat light, heat the radiator shutter surface.
(2) Remove any remaining double-sided tape from the radiator shutter.
(3) Wipe off any tape adhesive residue with cleaner.
(b) Remove the release paper from a new No. 2 radiator grille seal.
HINT:
After removing the release paper, keep the exposed adhesive free from foreign matter.
| (c) Install the No. 2 radiator grille seal. NOTICE:
|
|
.png)
2. INSTALL NO. 1 RADIATOR GRILLE SEAL
HINT:
When installing the No. 1 radiator grille seal, heat the radiator shutter using a heat light.
Heating Temperature| Item | Temperature |
|---|---|
| Radiator Shutter | 20 to 30°C (68 to 86°F) |
CAUTION:
- Do not touch the heat light and heated parts, touching the heat light may result in burns.
- Touching heated parts for a long time may result in burns.
| *a | Heated Part |
| *b | Heat Light |
NOTICE:
Do not heat the radiator shutter excessively.
(a) Clean the radiator shutter surface.
(1) Using a heat light, heat the radiator shutter surface.
(2) Remove any remaining double-sided tape from the radiator shutter.
(3) Wipe off any tape adhesive residue with cleaner.
(b) Using a heat light, heat the radiator shutter.
(c) Remove the release paper from a new No. 1 radiator grille seal.
HINT:
After removing the release paper, keep the exposed adhesive free from foreign matter.
| (d) Install the No. 1 radiator grille seal. NOTICE:
|
|
.png)
3. INSTALL NO. 3 RADIATOR GRILLE SEAL
HINT:
- When installing the No. 3 radiator grille seal, heat the radiator shutter using a heat light.
- Use the same procedure for the RH side and LH side.
| Item | Temperature |
|---|---|
| Radiator Shutter | 20 to 30°C (68 to 86°F) |
CAUTION:
- Do not touch the heat light and heated parts, touching the heat light may result in burns.
- Touching heated parts for a long time may result in burns.
| *a | Heated Part |
| *b | Heat Light |
NOTICE:
Do not heat the radiator shutter excessively.
(a) Clean the radiator shutter surface.
(1) Using a heat light, heat the radiator shutter surface.
(2) Remove any remaining double-sided tape from the radiator shutter.
(3) Wipe off any tape adhesive residue with cleaner.
(b) Remove the release paper from a new No. 3 radiator grille seal.
HINT:
After removing the release paper, keep the exposed adhesive free from foreign matter.
| (c) Install the No. 3 radiator grille seal. NOTICE:
|
|
.png)
4. INSTALL SWING GRILLE ACTUATOR ASSEMBLY
(a) When installing a new swing grille actuator assembly:
(1) Open the radiator shutter as shown in the illustration.
(b) Install the swing grille actuator assembly as shown in the illustration.
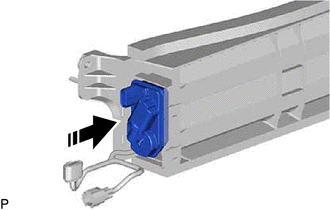
.png) | Install in this Direction |
5. INSTALL MOTOR COVER
(a) Engage the 4 claws to install the motor cover as shown in the illustration.
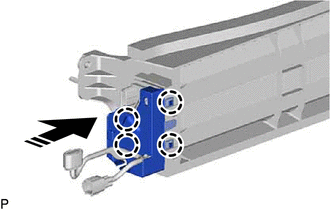
| | Install in this Direction |
| (b) Engage the 2 clamps. |
|
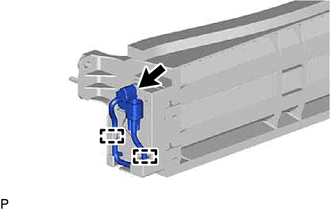
(c) Connect the connector.
READ NEXT:
 Installation
INSTALLATION PROCEDURE 1. INSTALL RADIATOR SHUTTER SUB-ASSEMBLY (a) Engage the 2 guides as shown in the illustration. Install in this Direction (b) Install the radiator shutter sub-assembly
Precaution
PRECAUTION PRECAUTION FOR DISCONNECTING CABLE FROM NEGATIVE AUXILIARY BATTERY TERMINAL NOTICE: When disconnecting the cable from the negative (-) auxiliary battery terminal, initialize the following s
SEE MORE:
Steering Angle Sensor Internal Circuit (C1433)
DESCRIPTION The skid control ECU (brake booster with master cylinder assembly) outputs this DTC when it receives an internal malfunction signal from the steering angle sensor. DTC No. Detection Item INF Code DTC Detection Condition Trouble Area MIL Note C1433 Steering Angle Sens
How To Proceed With Troubleshooting
CAUTION / NOTICE / HINT HINT:
Use the following procedure to troubleshoot the power mirror control system (w/ Memory).
*: Use the Techstream.
PROCEDURE 1. VEHICLE BROUGHT TO WORKSHOP
NEXT 2. CUSTOMER PROBLEM ANALYSIS HINT:
In troubleshooting, confirm tha
