Lexus ES: Disassembly
DISASSEMBLY
CAUTION / NOTICE / HINT
HINT:
- Use the same procedure for the RH side and LH side.
- The following procedure is for the LH side.
PROCEDURE
1. REMOVE HEADLIGHT ECU SUB-ASSEMBLY
Click here .gif)
2. REMOVE HEADLIGHT GASKET
Click here
3. REMOVE HEADLIGHT RIM
| (a) Remove the screw. |
|
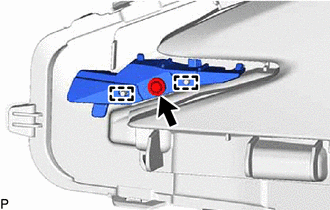
(b) Disengage the 2 guides to remove the headlight rim.
4. REMOVE NO. 2 HEADLIGHT FITTING RIM
| (a) Remove the 2 screws. |
|
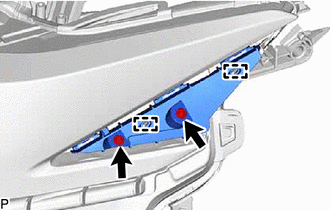
(b) Disengage the 2 guides to remove the No. 2 headlight fitting rim.
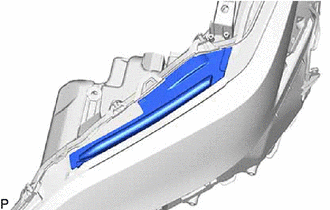
5. REMOVE HEADLIGHT UNIT ASSEMBLY
6. REMOVE HEADLIGHT SEAL (for TMC Made)
HINT:
Perform this procedure only when replacement of the headlight seal is necessary.
| (a) Remove the headlight seal. NOTICE: The headlight seal cannot be reused. |
|
READ NEXT:
 Adjustment
ADJUSTMENT CAUTION / NOTICE / HINT HINT:
Use the same procedure for the RH side and LH side.
The following procedure is for the LH side.
PROCEDURE 1. PREPARE VEHICLE FOR HEADLIGHT AIM ADJUSTME
Reassembly
REASSEMBLY CAUTION / NOTICE / HINT HINT:
Use the same procedure for the RH side and LH side.
The following procedure is for the LH side.
PROCEDURE 1. INSTALL HEADLIGHT SEAL (for TMC Made) HINT
Installation
INSTALLATION CAUTION / NOTICE / HINT HINT:
Use the same procedure for the RH side and LH side.
The following procedure is for the LH side.
PROCEDURE 1. INSTALL HEADLIGHT ASSEMBLY (a) Connect t
SEE MORE:
Removal
REMOVAL CAUTION / NOTICE / HINT The necessary procedures (adjustment, calibration, initialization, or registration) that must be performed after parts are removed and installed, or replaced during rear bumper assembly removal/installation are shown below. Necessary Procedure After Parts Removed/Inst
Components
COMPONENTS ILLUSTRATION *1 FUEL SUCTION PLATE SUB-ASSEMBLY *2 NO. 1 FUEL SUCTION SUPPORT *3 FUEL FILTER - -
© 2016-2026 Copyright www.lexguide.net
