Lexus ES: Disassembly
Lexus ES (XZ10) Service Manual / Vehicle Exterior / Exterior Panels / Trim / Rocker Panel Moulding / Disassembly
DISASSEMBLY
PROCEDURE
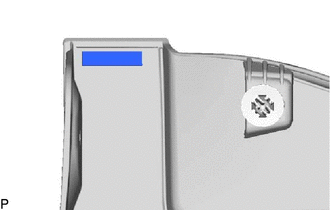
1. REMOVE NO. 4 ROCKER PANEL MOULDING PROTECTOR
| (a) Remove the No. 4 rocker panel moulding protector. |
|
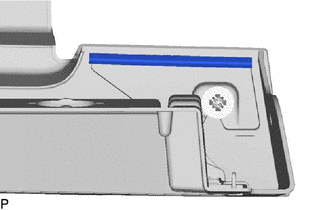
2. REMOVE NO. 5 ROCKER PANEL MOULDING PROTECTOR
| (a) Remove the No. 5 rocker panel moulding protector. |
|
READ NEXT:
 Reassembly
REASSEMBLY PROCEDURE 1. INSTALL NO. 5 ROCKER PANEL MOULDING PROTECTOR HINT: When installing the No. 5 rocker panel moulding protector, heat the body rocker panel moulding assembly using a heat light.
Installation
INSTALLATION CAUTION / NOTICE / HINT HINT:
Use the same procedure for the RH side and LH side.
The following procedure is for the LH side.
PROCEDURE 1. INSTALL BODY ROCKER PANEL MOULDING ASSEM
Roof Drip Side Finish Moulding
ComponentsCOMPONENTS ILLUSTRATION *1 CENTER ROOF DRIP SIDE FINISH MOULDING *2 NO. 1 ROOF DRIP SIDE FINISH MOULDING CLIP ● Non-reusable part - - RemovalREMOVAL CAUTION / NOTI
SEE MORE:
Reverse Signal Circuit
DESCRIPTION The multi-display receives a reverse signal from the BK UP LP relay*1 or clearance warning ECU assembly*2.
*1: w/o Parking Support Alert System
*2: w/ Parking Support Alert System
WIRING DIAGRAM for 8 inch display for 12.3 inch display w/ Parking Support Alert System CAUTION /
Drive Motor "A" Position Sensor Signal Amplitude < (P0A3F21,P0A3F22)
DTC SUMMARY MALFUNCTION DESCRIPTION These DTCs indicate that the resolver output signal is abnormal. The cause of this malfunction may be one of the following: Area Main Malfunction Description Inverter low-voltage circuit The connectors are not connected properly Hybrid vehicle trans
© 2016-2026 Copyright www.lexguide.net
