Lexus ES: Cornering Light Circuit
DESCRIPTION
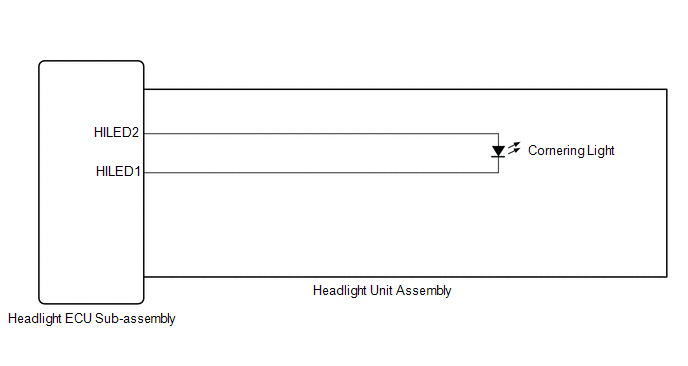
The headlight ECU sub-assembly controls the cornering lights.
WIRING DIAGRAM
except Bulb Type Turn Signal Light (for TMMK Made)
for Bulb Type Turn Signal Light (for TMMK Made)

CAUTION / NOTICE / HINT
NOTICE:
-
If the headlight ECU sub-assembly LH has been replaced, it is necessary to synchronize the vehicle information and initialize the headlight ECU sub-assembly LH.*1
Click here
.gif)
-
If the headlight ECU sub-assembly LH has been replaced, it is necessary to synchronize the vehicle information the headlight ECU sub-assembly LH.*2
Click here
-
If the headlight assembly LH has been replaced, it is necessary to synchronize the vehicle information the headlight ECU sub-assembly LH.*3
Click here
-
When replacing the headlight ECU sub-assembly LH, always replace it with a new one. If a headlight ECU sub-assembly LH which was installed to another vehicle is used, the information stored in it will not match the information from the vehicle and a DTC may be stored.
- *1: for LED Type Turn Signal Light
- *2: for Bulb Type Turn Signal Light
- *3: for Bulb Type Turn Signal Light (for TMMK Made)
PROCEDURE
| 1. | CONFIRM MODEL |
(a) Choose the model to be inspected.
| Result | Proceed to |
|---|---|
| for LED Type Turn Signal Light | A |
| for Bulb Type Turn Signal Light | B |
| B | .gif) | GO TO STEP 5 |
|
.gif)
| 2. | CHECK LIGHTS |
(a) Check the illumination of each cornering lights.
| Result | Proceed to |
|---|---|
| LH side cornering light does not illuminate | A |
| RH side cornering light does not illuminate | B |
| B | | GO TO STEP 4 |
|
| 3. | PERFORM ACTIVE TEST USING TECHSTREAM |
(a) Connect the Techstream to the DLC3.
(b) Turn the engine switch on (IG).
(c) Turn the Techstream on.
(d) Enter the following menus: Body Electrical / AFS / Active Test.
(e) Perform the Active Test according to the display on the Techstream.
Body Electrical > AFS > Active Test| Tester Display | Measurement Item | Control Range | Diagnostic Note |
|---|---|---|---|
| Cornering Light/Front Side Illuminate Light | Cornering light/front side illuminate light | OFF or ON | - |
| Tester Display |
|---|
| Cornering Light/Front Side Illuminate Light |
OK:
Cornering light turn on.
| OK | | PROCEED TO NEXT SUSPECTED AREA SHOWN IN PROBLEM SYMPTOMS TABLE |
| NG | | GO TO STEP 7 |
| 4. | PERFORM ACTIVE TEST USING TECHSTREAM |
(a) Connect the Techstream to the DLC3.
(b) Turn the engine switch on (IG).
(c) Turn the Techstream on.
(d) Enter the following menus: Body Electrical / AFS (Sub) / Active Test.
(e) Perform the Active Test according to the display on the Techstream.
Body Electrical > AFS (Sub) > Active Test| Tester Display | Measurement Item | Control Range | Diagnostic Note |
|---|---|---|---|
| Cornering Light/Front Side Illuminate Light | Cornering light/front side illuminate light | OFF or ON | - |
| Tester Display |
|---|
| Cornering Light/Front Side Illuminate Light |
OK:
Cornering light turn on.
| OK | | PROCEED TO NEXT SUSPECTED AREA SHOWN IN PROBLEM SYMPTOMS TABLE |
| NG | | GO TO STEP 12 |
| 5. | CHECK LIGHTS |
(a) Check the illumination of each cornering lights.
| Result | Proceed to |
|---|---|
| LH side cornering light does not illuminate | A |
| RH side cornering light does not illuminate | B |
| B | | GO TO STEP 11 |
|
| 6. | PERFORM ACTIVE TEST USING TECHSTREAM |
(a) Connect the Techstream to the DLC3.
(b) Turn the engine switch on (IG).
(c) Turn the Techstream on.
(d) Enter the following menus: Body Electrical / HL AutoLeveling / Active Test.
(e) Perform the Active Test according to the display on the Techstream.
Body Electrical > HL AutoLeveling > Active Test| Tester Display | Measurement Item | Control Range | Diagnostic Note |
|---|---|---|---|
| Cornering Light/Front Side Illuminate Light | Cornering light/front side illuminate light | OFF or ON | - |
| Tester Display |
|---|
| Cornering Light/Front Side Illuminate Light |
OK:
Cornering light turn on.
| Result | Proceed to |
|---|---|
| OK | A |
| NG (for TMC Made) | B |
| NG (for TMMK Made) | C |
| A | | PROCEED TO NEXT SUSPECTED AREA SHOWN IN PROBLEM SYMPTOMS TABLE |
| C | | GO TO STEP 9 |
|
| 7. | CHECK HEADLIGHT UNIT ASSEMBLY LH |
(a) Interchange the headlight unit assembly LH with RH and connect the connectors.
for LED Type Turn Signal Light: Click here
for Bulb Type Turn Signal Light: Click here
|
| 8. | CHECK OPERATION (CORNERING LIGHT) |
(a) Check that the cornering light operates normally.
Click here
OK:
Cornering light operates normally.
| OK | | REPLACE HEADLIGHT ECU SUB-ASSEMBLY LH |
| NG | | REPLACE HEADLIGHT UNIT ASSEMBLY LH |
| 9. | CHECK HEADLIGHT ASSEMBLY LH |
(a) Remove each headlight ECU sub-assembly, interchange the headlight assembly LH with RH and connect the connectors.
Click here
|
| 10. | CHECK OPERATION (CORNERING LIGHT) |
(a) Check that the cornering light operates normally.
Click here
OK:
Cornering light operates normally.
| OK | | REPLACE HEADLIGHT ECU SUB-ASSEMBLY LH |
| NG | | REPLACE HEADLIGHT ASSEMBLY LH |
| 11. | PERFORM ACTIVE TEST USING TECHSTREAM |
(a) Connect the Techstream to the DLC3.
(b) Turn the engine switch on (IG).
(c) Turn the Techstream on.
(d) Enter the following menus: Body Electrical / HL AutoLeveling (Sub) / Active Test.
(e) Perform the Active Test according to the display on the Techstream.
Body Electrical > HL AutoLeveling (Sub) > Active Test| Tester Display | Measurement Item | Control Range | Diagnostic Note |
|---|---|---|---|
| Cornering Light/Front Side Illuminate Light | Cornering light/front side illuminate light | OFF or ON | - |
| Tester Display |
|---|
| Cornering Light/Front Side Illuminate Light |
OK:
Cornering light turn on.
| Result | Proceed to |
|---|---|
| OK | A |
| NG (for TMC Made) | B |
| NG (for TMMK Made) | C |
| A | | PROCEED TO NEXT SUSPECTED AREA SHOWN IN PROBLEM SYMPTOMS TABLE |
| C | | GO TO STEP 14 |
|
| 12. | CHECK HEADLIGHT UNIT ASSEMBLY RH |
(a) Interchange the headlight unit assembly RH with LH and connect the connectors.
for LED Type Turn Signal Light: Click here
for Bulb Type Turn Signal Light: Click here
|
| 13. | CHECK OPERATION (CORNERING LIGHT) |
(a) Check that the cornering light operates normally.
Click here
OK:
Cornering light operates normally.
| OK | | REPLACE HEADLIGHT ECU SUB-ASSEMBLY RH |
| NG | | REPLACE HEADLIGHT UNIT ASSEMBLY RH |
| 14. | CHECK HEADLIGHT ASSEMBLY RH |
(a) Remove each headlight ECU sub-assembly, interchange the headlight assembly RH with LH and connect the connectors.
Click here
|
| 15. | CHECK OPERATION (CORNERING LIGHT) |
(a) Check that the cornering light operates normally.
Click here
OK:
Cornering light operates normally.
| OK | | REPLACE HEADLIGHT ECU SUB-ASSEMBLY RH |
| NG | | REPLACE HEADLIGHT ASSEMBLY RH |
READ NEXT:
 High Beam Headlight Circuit
DESCRIPTION The headlight ECU sub-assembly controls the high beam headlights. WIRING DIAGRAM except Bulb Type Turn Signal Light (for TMMK Made) for Bulb Type Turn Signal Light (for TMMK Made) CAUTIO
Precaution
PRECAUTION PRECAUTION FOR DISCONNECTING CABLE FROM NEGATIVE AUXILIARY BATTERY TERMINAL NOTICE: When disconnecting the cable from the negative (-) auxiliary battery terminal, initialize the following s
SEE MORE:
Installation
INSTALLATION PROCEDURE 1. INSTALL WATER INLET WITH THERMOSTAT SUB-ASSEMBLY (a) Install a new gasket to the water inlet with thermostat sub-assembly. (b) Install the water inlet with thermostat sub-assembly with the 2 bolts and 2 nuts. Torque: 10 N·m {102 kgf·cm, 7 ft·lbf} 2. CONNECT WATER BY-PAS
Calibration
CALIBRATION NOTICE: When any of the following parts have been replaced, perform adjustment shown in the following table. If not, the parking support alert system may not operate correctly. ADJUST PARKING SUPPORT ALERT SYSTEM The necessary procedures (adjustment, calibration, initialization or regist
