Lexus ES: Components
COMPONENTS
ILLUSTRATION
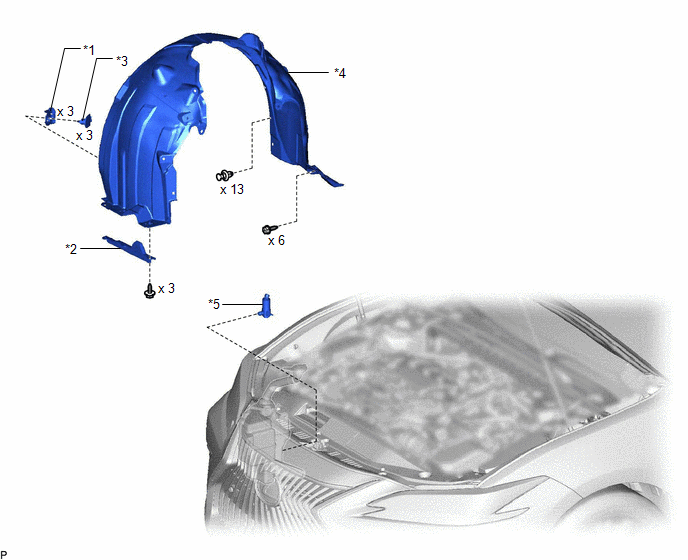
| *1 | FRONT FENDER LINER RETAINER | *2 | FRONT WHEEL OPENING EXTENSION PAD RH |
| *3 | PIN HOLD CLIP | *4 | REAR FENDER SPLASH SHIELD SUB-ASSEMBLY RH |
| *5 | WINDSHIELD WASHER MOTOR AND PUMP ASSEMBLY | - | - |
READ NEXT:
 Removal
REMOVAL PROCEDURE 1. REMOVE FRONT WHEEL RH Click here 2. REMOVE FRONT WHEEL OPENING EXTENSION PAD RH (a) Remove the 3 screws and front wheel opening extension pad RH. 3. REMOVE REAR F
Inspection
INSPECTION PROCEDURE 1. INSPECT WINDSHIELD WASHER MOTOR AND PUMP ASSEMBLY *a Component without harness connected (Windshield Washer Motor and Pump Assembly) (a) Remove the washer jar. (b) Dis
Installation
INSTALLATION PROCEDURE 1. INSTALL WINDSHIELD WASHER MOTOR AND PUMP ASSEMBLY (a) Install the windshield washer motor and pump assembly as shown in the illustration. Install in this Direction
SEE MORE:
Parts Location
PARTS LOCATION ILLUSTRATION *1 FRONT TELEVISION CAMERA ASSEMBLY *2 BRAKE ACTUATOR ASSEMBLY - SKID CONTROL ECU *3 SIDE TELEVISION CAMERA ASSEMBLY RH *4 SIDE TELEVISION CAMERA ASSEMBLY LH *5 ECM *6 PARK/NEUTRAL POSITION SWITCH ASSEMBLY *7 REAR TELEVISION CAMERA ASSE
Transmission (Shaft) Mechanical Linkage Failure (P314779)
DTC SUMMARY Refer to the DTC summary for DTC P1C7779. Click here DESCRIPTION Refer to the description for DTC P1C7779. Click here DTC No. Detection Item DTC Detection Condition Trouble Area MIL Warning Indicate P314779 Transmission (Shaft) Mechanical Linkage Failure Drive fo
© 2016-2026 Copyright www.lexguide.net
