Lexus ES: Installation
INSTALLATION
PROCEDURE
1. INSTALL WINDSHIELD WASHER MOTOR AND PUMP ASSEMBLY
(a) Install the windshield washer motor and pump assembly as shown in the illustration.
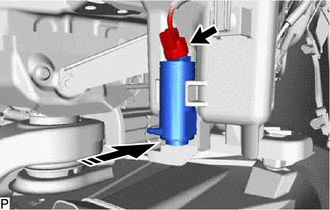
.png) | Install in this Direction |
(b) Connect the connector.
(c) Connect the washer hose.
2. ADD WASHER FLUID
(a) Connect the washer hose.
(b) Add washer fluid to the washer jar.
3. INSTALL FRONT FENDER LINER RETAINER
HINT:
Use the same procedure for the RH side and LH side.
Click here .gif)
4. INSTALL REAR FENDER SPLASH SHIELD SUB-ASSEMBLY RH
(a) Install the rear fender splash shield sub-assembly RH with the 13 clips and 6 screws.
(b) Engage the 3 claws.
5. INSTALL PIN HOLD CLIP
(a) Engage the 6 claws to install the 3 pin hold clips as shown in the illustration.
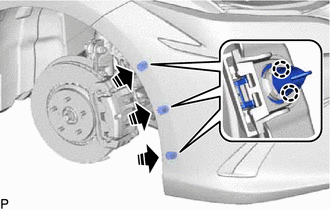
| | Install in this Direction |
6. INSTALL FRONT WHEEL OPENING EXTENSION PAD RH
(a) Install the front wheel opening extension pad RH with the 3 screws.
7. INSTALL FRONT WHEEL RH
Click here
READ NEXT:
 Components
COMPONENTS ILLUSTRATION *1 WASHER NOZZLE SUB-ASSEMBLY - - ● Non-reusable part - -
On-vehicle Inspection
ON-VEHICLE INSPECTION PROCEDURE 1. INSPECT WASHER NOZZLE SUB-ASSEMBLY (a) Operate the washer nozzle sub-assemblies and check the position that the washer fluid contacts the windshield. Standard: Cent
SEE MORE:
Installation
INSTALLATION PROCEDURE 1. INSTALL NAVIGATION ECU 2. INSTALL NO. 1 RADIO RECEIVER BRACKET (a) Install the No. 1 radio receiver bracket with the 2 screws. 3. INSTALL NAVIGATION ECU WITH BRACKET (a) Engage the 4 claws to temporarily install the navigation ECU with bracket as shown in the illustration.
On-vehicle Inspection
ON-VEHICLE INSPECTION PROCEDURE 1. REMOVE FRONT WHEEL OPENING EXTENSION PAD RH Click here 2. REMOVE FRONT WHEEL OPENING EXTENSION PAD LH Click here 3. REMOVE NO. 1 ENGINE UNDER COVER Click here 4. REMOVE NO. 2 ENGINE UNDER COVER ASSEMBLY Click here 5. INSPECT HYBRID TRANSAXLE FLUID
