Lexus ES manuals

Lexus ES: Components

COMPONENTS

ILLUSTRATION
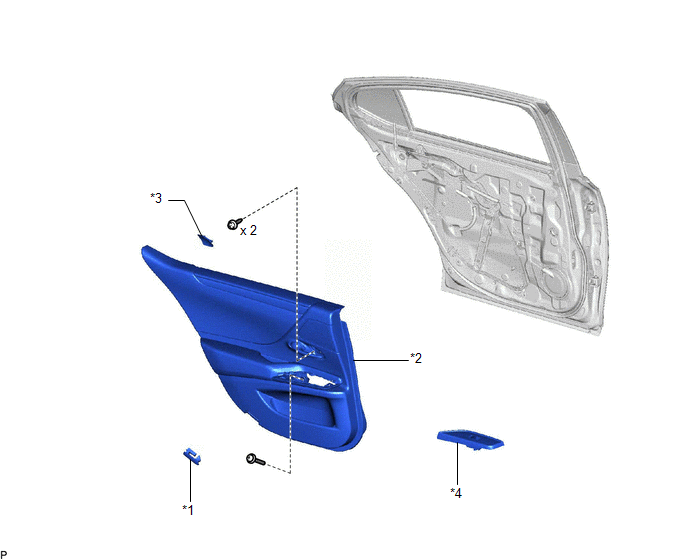
*1

COURTESY LIGHT ASSEMBLY

*2

REAR DOOR TRIM BOARD SUB-ASSEMBLY

*3

REAR DOOR TRIM UPPER PAD

*4

REAR POWER WINDOW REGULATOR SWITCH ASSEMBLY WITH REAR DOOR UPPER ARMREST BASE PANEL

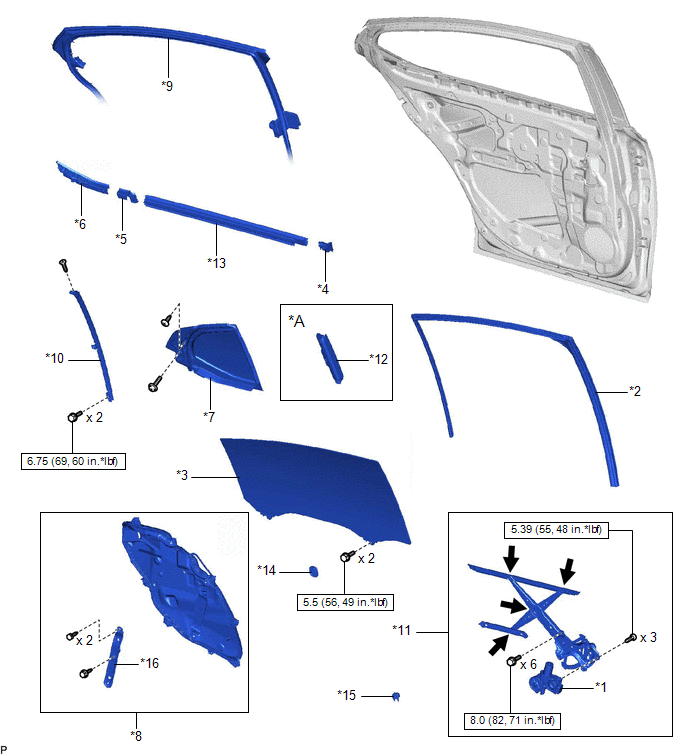
ILLUSTRATION

*A

w/ Rear Door Sunshade

-

-

*1

POWER WINDOW REGULATOR MOTOR ASSEMBLY

*2

REAR DOOR GLASS RUN

*3

REAR DOOR GLASS SUB-ASSEMBLY

*4

REAR DOOR NO. 2 SERVICE HOLE COVER

*5

REAR DOOR NO. 2 VENT SEAL

*6

REAR DOOR PANEL PROTECTOR

*7

REAR DOOR QUARTER WINDOW GLASS SUB-ASSEMBLY

*8

REAR DOOR SERVICE HOLE COVER

*9

REAR DOOR WEATHERSTRIP

*10

REAR DOOR WINDOW DIVISION BAR SUB-ASSEMBLY

*11

REAR DOOR WINDOW REGULATOR ASSEMBLY

*12

REAR SIDE CURTAIN ASSEMBLY

*13

REAR DOOR INNER GLASS WEATHERSTRIP

*14

HOLE PLUG

*15

REAR DOOR NO. 3 SERVICE HOLE COVER

*16

BRACKET

N*m (kgf*cm, ft.*lbf): Specified torque

MP grease

READ NEXT:

 Removal

REMOVAL CAUTION / NOTICE / HINT The necessary procedures (adjustment, calibration, initialization, or registration) that must be performed after parts are removed and installed, or replaced during pow

 Inspection

INSPECTION PROCEDURE 1. INSPECT POWER WINDOW REGULATOR MOTOR ASSEMBLY (FOR REAR LH DOOR) (a) Connect a positive (+) lead from the auxiliary battery to connector terminal 2. NOTICE: Do not connect a

 Installation

INSTALLATION CAUTION / NOTICE / HINT HINT: Use the same procedure for the RH side and LH side. The following procedure is for the LH side. PROCEDURE 1. PRECAUTION NOTICE: After turning the eng

SEE MORE:

 How To Proceed With Troubleshooting

CAUTION / NOTICE / HINT HINT: The ECM is connected to the CAN communication system. Therefore, before starting troubleshooting, make sure to check that there are no malfunctions in the CAN communication system. *: Use the Techstream. PROCEDURE 1. VEHICLE BROUGHT TO WORKSHOP NE

 Removal

REMOVAL CAUTION / NOTICE / HINT The necessary procedures (adjustment, calibration, initialization or registration) that must be performed after parts are removed and installed, or replaced during fuel pump assembly removal/installation are shown below. Necessary Procedures After Parts Removed/Instal

© 2016-2024 Copyright www.lexguide.net