
Lexus ES: Components
COMPONENTS
ILLUSTRATION
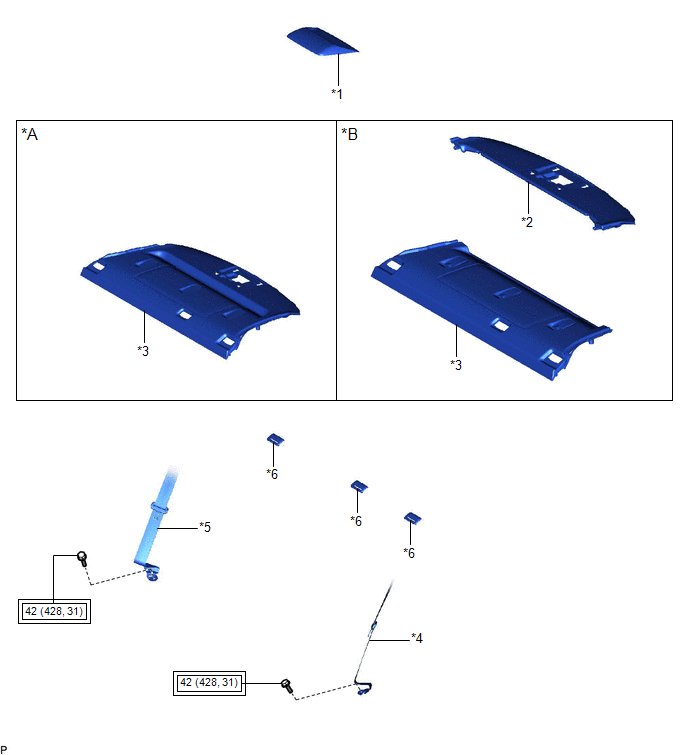
| *A | w/o Rear Sunshade | *B | w/ Rear Sunshade |
| *1 | CENTER STOP LIGHT SET | *2 | NO. 2 PACKAGE TRAY TRIM PANEL ASSEMBLY |
| *3 | PACKAGE TRAY TRIM PANEL ASSEMBLY | *4 | REAR SEAT OUTER BELT ASSEMBLY LH |
| *5 | REAR SEAT OUTER BELT ASSEMBLY RH | *6 | REAR SEAT SHOULDER BELT COVER |
.png) | Tightening torque for "Major areas involving basic vehicle performance such as moving/turning/stopping": N*m (kgf*cm, ft.*lbf) | - | - |
ILLUSTRATION
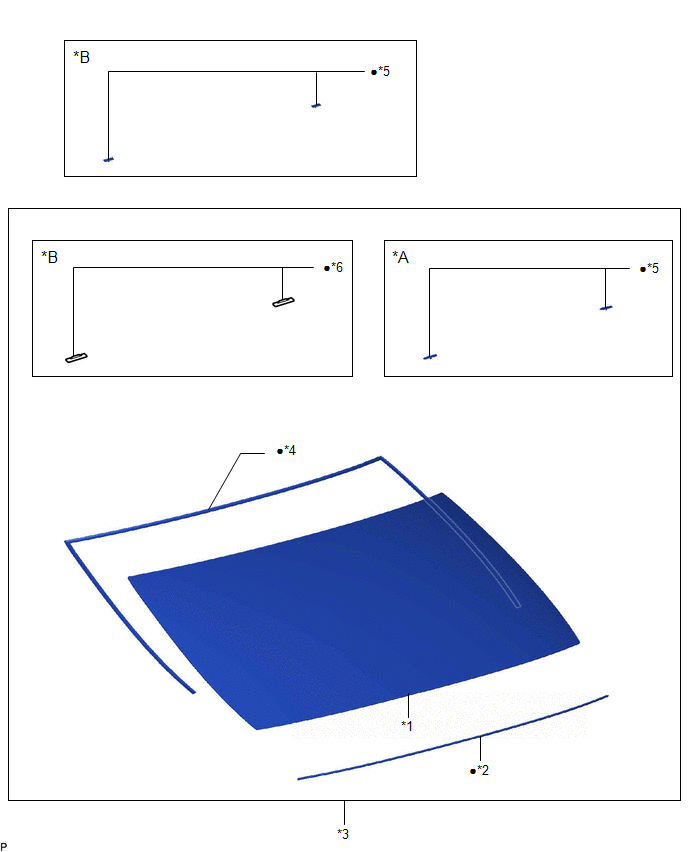
| *A | for 1-piece Type | *B | for 2-piece Type |
| *1 | BACK WINDOW GLASS | *2 | BACK WINDOW GLASS ADHESIVE DAM |
| *3 | BACK WINDOW GLASS SUB-ASSEMBLY | *4 | BACK WINDOW OUTSIDE MOULDING |
| *5 | NO. 1 BACK WINDOW GLASS STOPPER | *6 | NO. 2 BACK WINDOW GLASS STOPPER |
| ● | Non-reusable part | - | - |
READ NEXT:
 Removal
REMOVAL CAUTION / NOTICE / HINT The necessary procedures (adjustment, calibration, initialization or registration) that must be performed after parts are removed and installed, or replaced during back
Installation
INSTALLATION PROCEDURE 1. INSTALL NO. 1 BACK WINDOW GLASS STOPPER (for 2-piece Type) (a) Install 2 new No. 1 back window glass stoppers to the vehicle body as shown in the illustration. HINT: Only
Front Passenger Side Power Window Switch
ComponentsCOMPONENTS ILLUSTRATION *1 POWER WINDOW REGULATOR SWITCH ASSEMBLY *2 POWER WINDOW REGULATOR SWITCH ASSEMBLY WITH FRONT DOOR UPPER ARMREST BASE PANEL RemovalREMOVAL PROCEDURE 1
SEE MORE:
Under Hood
UNDER HOOD
GENERAL NOTES
Maintenance requirements vary depending on country.
Check the maintenance schedule in the owner's manual.
Following the maintenance schedule is mandatory.
Determine the appropriate time to service the vehicle using either miles
driven or time (mo
Components
COMPONENTS ILLUSTRATION *1 FRONT RADIATOR SIDE AIR GUIDE PLATE LH *2 FRONT RADIATOR SIDE AIR GUIDE PLATE RH *3 RADIATOR SHUTTER SUB-ASSEMBLY *4 THERMISTOR ASSEMBLY N*m (kgf*cm, ft.*lbf): Specified torque - - ILLUSTRATION *1 MOTOR COVER *2 NO. 1 RADIATOR GR
© 2016-2026 Copyright www.lexguide.net
