Lexus ES: Components
COMPONENTS
ILLUSTRATION
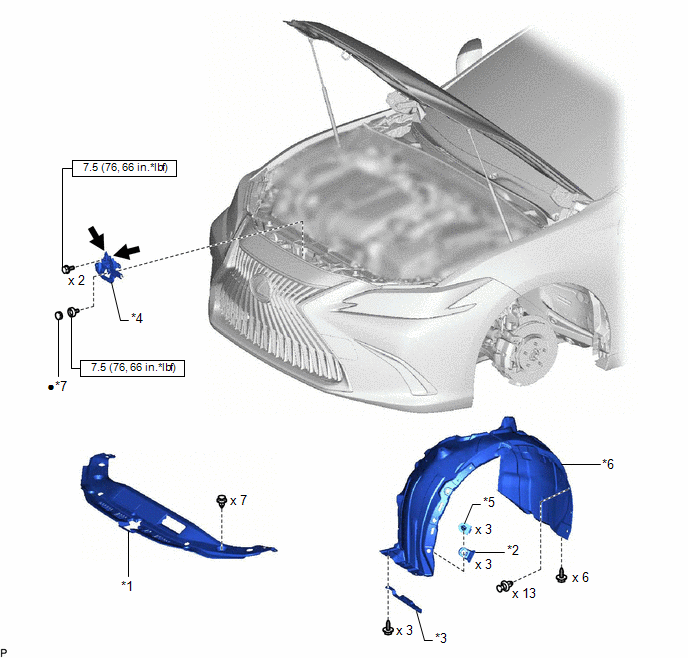
| *1 | COOL AIR INTAKE DUCT SEAL | *2 | FRONT FENDER LINER RETAINER |
| *3 | FRONT WHEEL OPENING EXTENSION PAD LH | *4 | HOOD LOCK ASSEMBLY |
| *5 | PIN HOLD CLIP | *6 | REAR FENDER SPLASH SHIELD SUB-ASSEMBLY LH |
| *7 | HOOD LOCK NUT CAP | - | - |
.png) | N*m (kgf*cm, ft.*lbf): Specified torque | ● | Non-reusable part |
.png) | MP grease | - | - |
ILLUSTRATION
.png)
| *1 | COWL SIDE TRIM BOARD LH | *2 | FRONT DOOR OPENING TRIM COVER LH |
| *3 | FRONT DOOR SCUFF PLATE LH | *4 | HOOD LOCK CONTROL CABLE ASSEMBLY |
| *5 | HOOD LOCK CONTROL LEVER SUB-ASSEMBLY | *6 | INSTRUMENT SIDE PANEL LH |
| *7 | LOWER INSTRUMENT PANEL FINISH PANEL SUB-ASSEMBLY | *8 | NO. 1 INSTRUMENT PANEL UNDER COVER SUB-ASSEMBLY |
READ NEXT:
 Removal
REMOVAL PROCEDURE 1. REMOVE FRONT WHEEL LH Click here 2. REMOVE FRONT WHEEL OPENING EXTENSION PAD LH HINT: Use the same procedure as for the RH side. Click here 3. REMOVE REAR FENDER SPLASH SHIELD
Removal
REMOVAL PROCEDURE 1. REMOVE FRONT WHEEL LH Click here 2. REMOVE FRONT WHEEL OPENING EXTENSION PAD LH HINT: Use the same procedure as for the RH side. Click here 3. REMOVE REAR FENDER SPLASH SHIELD
Installation
INSTALLATION PROCEDURE 1. INSTALL HOOD LOCK CONTROL CABLE ASSEMBLY (a) Pass the hood lock control cable assembly into the engine compartment. (b) Engage the grommet. (c) Engage each clamp. (d) Engage
SEE MORE:
Tire Pressure Warning Light Circuit
DESCRIPTION If the tire pressure warning ECU and receiver detects any problems, the tire pressure warning light blinks for 1 minute then illuminates, and tire pressure monitoring is disabled at the same time. At this time, the ECU stores a DTC in memory. The tire pressure warning ECU and receiver se
Camera Position Adjustment Incomplete (C1697)
DESCRIPTION This DTC is stored when the parking assist ECU judges that the camera initial setting has not been memorized (camera view adjustment is incomplete). DTC No. Detection Item DTC Detection Condition Trouble Area C1697 Camera Position Adjustment Incomplete Camera initial set
© 2016-2026 Copyright www.lexguide.net
