Lexus ES: Components
COMPONENTS
ILLUSTRATION
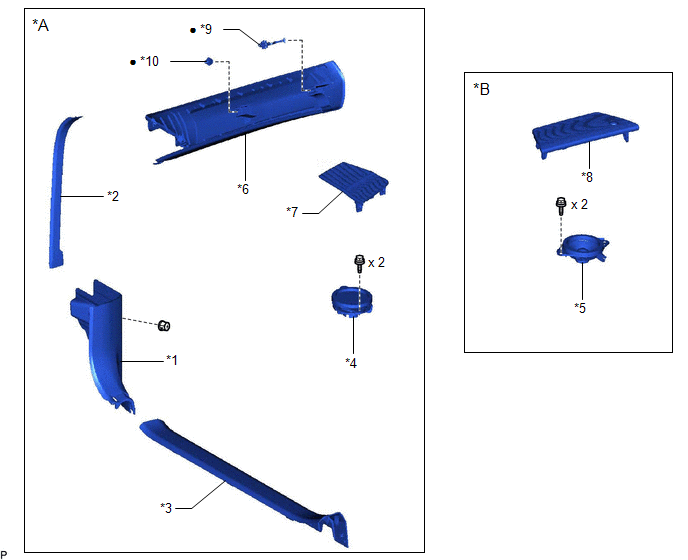
| *A | for Side | *B | for Center |
| *1 | COWL SIDE TRIM BOARD | *2 | FRONT DOOR OPENING TRIM COVER |
| *3 | FRONT DOOR SCUFF PLATE | *4 | FRONT NO. 2 SPEAKER ASSEMBLY |
| *5 | FRONT NO. 3 SPEAKER ASSEMBLY | *6 | FRONT PILLAR GARNISH ASSEMBLY |
| *7 | NO. 1 INSTRUMENT PANEL SPEAKER PANEL SUB-ASSEMBLY | *8 | NO. 1 SPEAKER OPENING COVER ASSEMBLY |
| *9 | FRONT PILLAR GARNISH CLIP | *10 | CLIP |
| ● | Non-reusable part | - | - |
READ NEXT:
 Inspection
INSPECTION PROCEDURE 1. INSPECT FRONT NO. 2 SPEAKER ASSEMBLY (a) With the speaker installed, check that there is no looseness or other abnormalities. (b) Check that there is no foreign matter in the s
Installation
INSTALLATION CAUTION / NOTICE / HINT HINT: for Side:
Use the same procedure for the RH side and LH side.
The following procedure is for the LH side.
PROCEDURE 1. INSTALL FRONT NO. 3 SPEAKER AS
Removal
REMOVAL CAUTION / NOTICE / HINT HINT: for Side:
Use the same procedure for the RH side and LH side.
The following procedure is for the LH side.
PROCEDURE 1. REMOVE FRONT DOOR SCUFF PLATE (for
SEE MORE:
Replacement
REPLACEMENT
CAUTION / NOTICE / HINT
NOTICE:
Perform fluid replacement with the shift lever in P and the parking
brake applied.
Perform fluid replacement while maintaining the brake fluid level between
the MAX and MIN lines on the brake fluid reservoir.
If the No. 1 brake a
Unable To Connect To Call Center
DESCRIPTION This may occur when the intensity of telephone radio frequency was very weak, or the safety connect system has a malfunction and a DTC is set. PROCEDURE 1. CHECK COMMUNICATION SERVICE CONDITION (a) Move the vehicle. (1) If the vehicle is outside the communication service area, m
© 2016-2026 Copyright www.lexguide.net
