Lexus ES: Components
Lexus ES (XZ10) Service Manual / Suspension / Front Suspension / Front Lower Ball Joint / Components
COMPONENTS
ILLUSTRATION
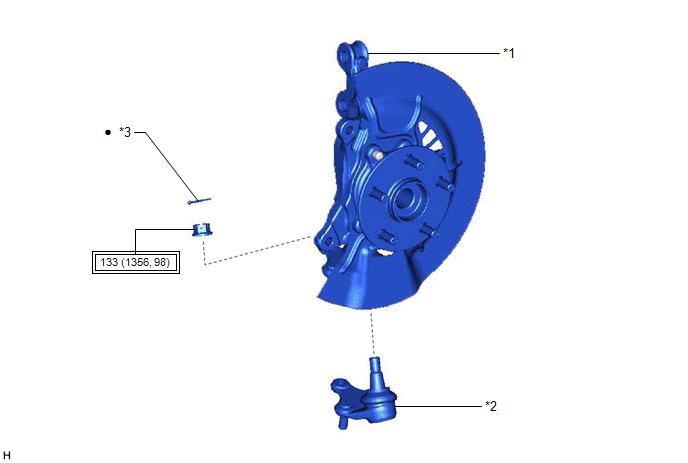
| *1 | FRONT AXLE ASSEMBLY | *2 | FRONT LOWER BALL JOINT ASSEMBLY |
| *3 | COTTER PIN | - | - |
 | Tightening torque for "Major areas involving basic vehicle performance such as moving/turning/stopping": N*m (kgf*cm, ft.*lbf) | ● | Non-reusable part |
READ NEXT:
 On-vehicle Inspection
ON-VEHICLE INSPECTION PROCEDURE 1. INSPECT FRONT LOWER BALL JOINT ASSEMBLY (a) Check for looseness. (1) Lift up the vehicle. (2) Move the front lower No. 1 suspension arm sub-assembly up and down b
Removal
REMOVAL CAUTION / NOTICE / HINT The necessary procedures (adjustment, calibration, initialization, or registration) that must be performed after parts are removed and installed, or replaced during fro
Inspection
INSPECTION PROCEDURE 1. INSPECT FRONT LOWER BALL JOINT ASSEMBLY (a) Inspect the turning torque of the ball joint. (1) Secure the front lower ball joint assembly in a vise using aluminum plates. (2)
SEE MORE:
Parking Support Brake function
(static objects)
If the sensors detect a static object, such as a wall, in the traveling
direction of
the vehicle and the system determines that a collision may occur due to the
vehicle suddenly moving forward due to an accidental accelerator pedal
operation,
the vehicle moving the unintended direction due to
Camshaft Position "B" - Timing Over-Advanced or System Performance Bank 1 (P001400,P001500,P002400,P002500)
DESCRIPTION Refer to DTC P001313. Click here DTC No. Detection Item DTC Detection Condition Trouble Area MIL Memory Note P001400 Camshaft Position "B" - Timing Over-Advanced or System Performance Bank 1 Exhaust valve timing is stuck at a certain value when in the advance ran
© 2016-2026 Copyright www.lexguide.net
