Lexus ES: Inspection
INSPECTION
PROCEDURE
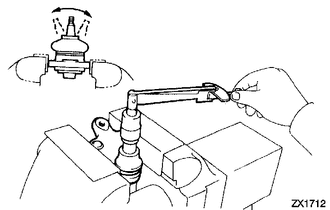
1. INSPECT FRONT LOWER BALL JOINT ASSEMBLY
| (a) Inspect the turning torque of the ball joint. (1) Secure the front lower ball joint assembly in a vise using aluminum plates. (2) Install the nut to the front lower ball joint assembly stud. (3) Using a torque wrench, turn the stud continuously at a rate of 3 to 5 seconds per turn and take the torque reading on the 5th turn. Turning Torque: 0.98 to 3.43 N*m (10 to 34 kgf*cm, 9 to 30 in.*lbf) HINT: If the turning torque is not within the specified range, replace the front lower ball joint assembly with a new one. (4) Turn the stud to check that the stud does not catch and there is no play. HINT: If the stud catches or there is play while turning, replace the front lower ball joint assembly with a new one. |
|
(b) Inspect the dust cover.
(1) Check that the dust cover is not cracked and that there is no grease on it.
HINT:
If the dust cover is cracked or there is grease on it, replace the front lower ball joint assembly with a new one.
READ NEXT:
 Installation
INSTALLATION CAUTION / NOTICE / HINT for HV Model:
When removing or installing the front disc brake caliper assembly, pushing back the disc brake piston may cause a large clearance between the brak
Components
COMPONENTS ILLUSTRATION *A for A25A-FXS *B for 2GR-FKS *C Type A *D Type B *1 FRONT FENDER APRON SEAL LH *2 FRONT FLOOR COVER LH *3 FRONT WHEEL OPENING EXTENSION PA
SEE MORE:
Throttle Actuator "A" Control System Actuator Stuck Open (P211172,P211173)
DESCRIPTION The throttle actuator is operated by the ECM and opens and closes the throttle valve using gears. The opening angle of the throttle valve is detected by the throttle position sensor, which is built into the throttle body with motor assembly. The throttle position sensor provides feedback
12-volt battery
Location
The 12-volt battery is located on the
right-hand side of the trunk.
■Before recharging
When recharging, the 12-volt battery produces
hydrogen gas which is flammable
and explosive. Therefore, observe the following
precautions before recharging:
If recharging with the 12-volt b
