Lexus ES: Components
COMPONENTS
ILLUSTRATION
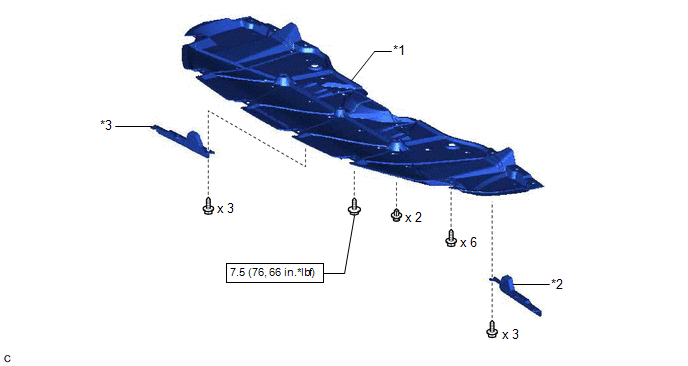
| *1 | NO. 1 ENGINE UNDER COVER | *2 | FRONT WHEEL OPENING EXTENSION PAD LH |
| *3 | FRONT WHEEL OPENING EXTENSION PAD RH | - | - |
.png) | N*m (kgf*cm, ft.*lbf): Specified torque | - | - |
ILLUSTRATION
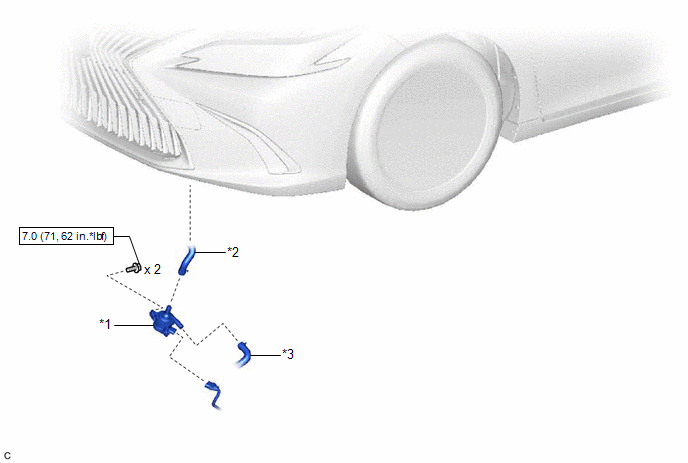
| *1 | INVERTER WATER PUMP ASSEMBLY | *2 | NO. 2 INVERTER COOLING HOSE |
| *3 | NO. 3 INVERTER COOLING HOSE | - | - |
| | N*m (kgf*cm, ft.*lbf): Specified torque | - | - |
READ NEXT:
 Removal
REMOVAL PROCEDURE 1. REMOVE FRONT WHEEL OPENING EXTENSION PAD LH Click here 2. REMOVE FRONT WHEEL OPENING EXTENSION PAD RH Click here 3. REMOVE NO. 1 ENGINE UNDER COVER Click here 4. DRAIN
Installation
INSTALLATION PROCEDURE 1. INSTALL INVERTER WATER PUMP ASSEMBLY (a) Connect the No. 2 inverter cooling hose and No. 3 inverter cooling hose to the inverter water pump assembly and slide the 2 clips
Power Source & Network
h1 {color:red;} h2 {color:blue;} h3 {color:green;}
SEE MORE:
Satellite Radio Broadcast cannot be Selected or After Selecting Broadcast, Broadcast cannot be Added into Memory
CAUTION / NOTICE / HINT NOTICE: Some satellite radio broadcasts require payment. A contract must be made between a satellite radio company and the user. If the contract expires, it will not be possible to listen to the broadcast. PROCEDURE 1. CHECK SATELLITE RADIO (a) Check radio condition.
Automatic High Beam Switch Indicator does not Come ON
DESCRIPTION When the automatic high beam system is on, the steering sensor illuminates the automatic high beam switch indicator. WIRING DIAGRAM PROCEDURE 1. READ VALUE USING TECHSTREAM (a) Connect the Techstream to the DLC3. (b) Turn the power switch on (IG). (c) Turn the Techstream on. (d
© 2016-2026 Copyright www.lexguide.net
