Lexus ES: Components
COMPONENTS
ILLUSTRATION
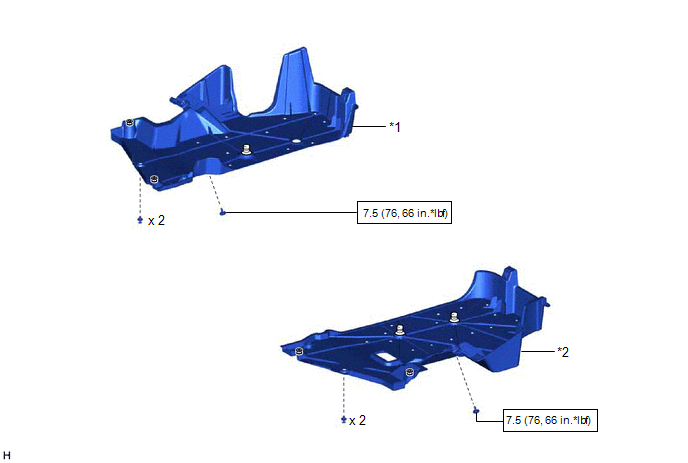
| *1 | NO. 1 FLOOR UNDER COVER | *2 | NO. 2 FLOOR UNDER COVER |
.png) | N*m (kgf*cm, ft.*lbf): Specified torque | - | - |
ILLUSTRATION
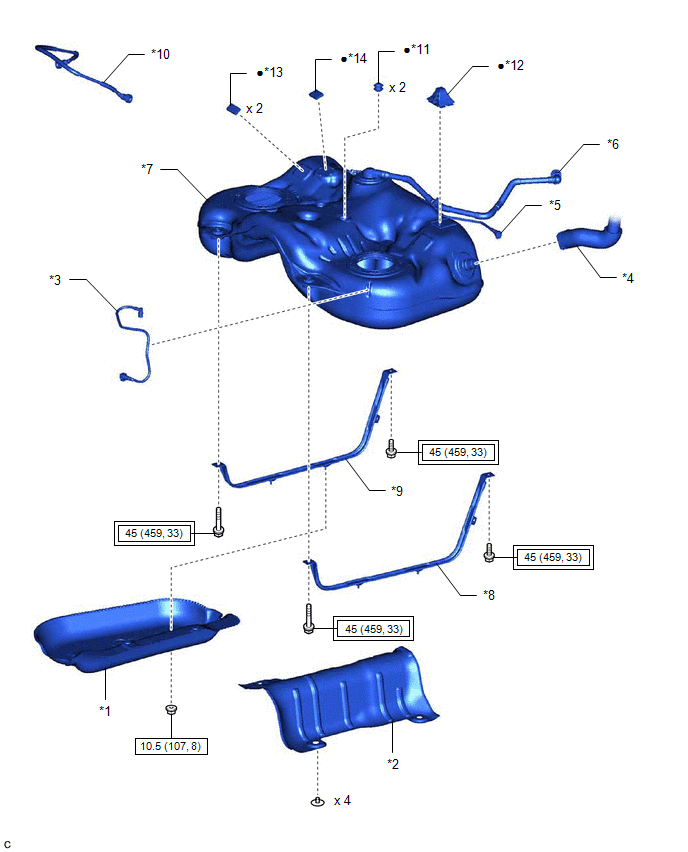
| *1 | NO. 2 FUEL TANK PROTECTOR | *2 | NO. 1 FUEL TANK PROTECTOR SUB-ASSEMBLY |
| *3 | FUEL TANK MAIN TUBE SUB-ASSEMBLY | *4 | INLET FUEL TANK PIPE SUB-ASSEMBLY |
| *5 | NO. 1 FUEL TANK BREATHER TUBE SUB-ASSEMBLY | *6 | FUEL CUT OFF VALVE WITH TUBE ASSEMBLY |
| *7 | FUEL TANK ASSEMBLY | *8 | NO. 1 FUEL TANK BAND SUB-ASSEMBLY LH |
| *9 | NO. 1 FUEL TANK BAND SUB-ASSEMBLY RH | *10 | FUEL RETURN VENT TUBE SUB-ASSEMBLY |
| *11 | NO. 4 FUEL TANK CUSHION | *12 | NO. 1 FUEL TANK CUSHION |
| *13 | NO. 3 FUEL TANK CUSHION | *14 | NO. 2 FUEL TANK CUSHION |
.png) | Tightening torque for "Major areas involving basic vehicle performance such as moving/turning/stopping": N*m (kgf*cm, ft.*lbf) | | N*m (kgf*cm, ft.*lbf): Specified torque |
| ● | Non-reusable part | - | - |
READ NEXT:
 Installation
INSTALLATION PROCEDURE 1. INSTALL NO. 2 FUEL TANK CUSHION (a) Install a new No. 2 fuel tank cushion to the fuel tank assembly. 2. INSTALL NO. 3 FUEL TANK CUSHION (a) Install 2 new No. 3 fuel tank cush
Air Cleaner Filter Element
ComponentsCOMPONENTS ILLUSTRATION *1 AIR CLEANER CAP SUB-ASSEMBLY *2 AIR CLEANER FILTER ELEMENT SUB-ASSEMBLY RemovalREMOVAL PROCEDURE 1. SEPARATE AIR CLEANER CAP SUB-ASSEMBLY Click here
SEE MORE:
Removal
REMOVAL CAUTION / NOTICE / HINT The necessary procedures (adjustment, calibration, initialization or registration) that must be performed after parts are removed and installed, or replaced during level warning switch assembly removal/installation are shown below. Necessary Procedure After Parts Remo
Hybrid/EV Battery Energy Control Module Processor to Monitoring Processor Signal Invalid (P060629)
DESCRIPTION The battery ECU assembly monitors its internal operation and will store these DTCs when it detects an internal malfunction. DTC No. Detection Item DTC Detection Condition Trouble Area MIL Warning Indicate P060629 Hybrid/EV Battery Energy Control Module Processor to Mon
