Lexus ES: A25a-fxs Oil And Oil Filter
Components
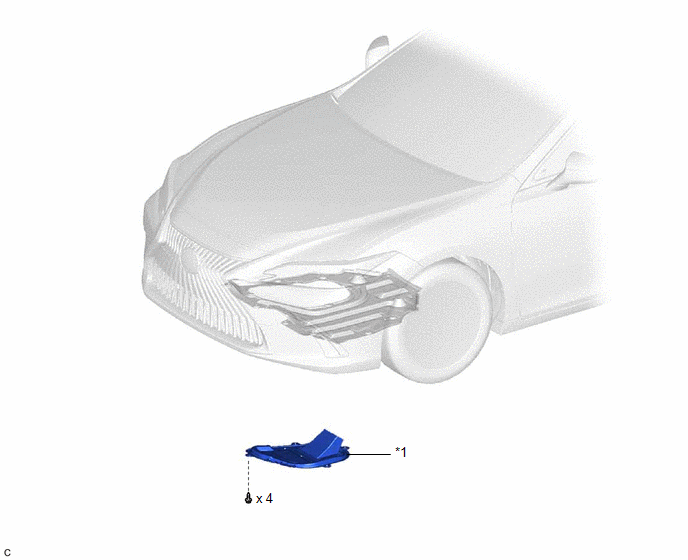
COMPONENTS
ILLUSTRATION
|
*1 |
CENTER NO. 4 ENGINE UNDER COVER |
- |
- |
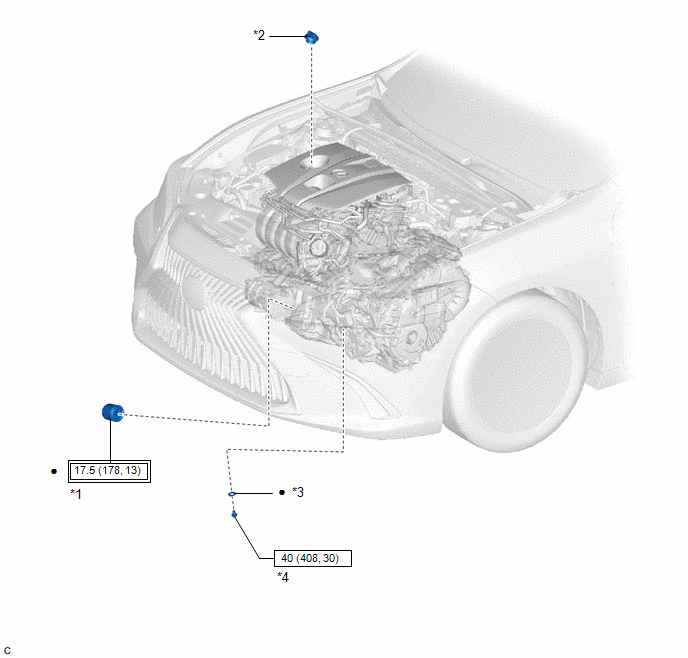
ILLUSTRATION
|
*1 |
OIL FILTER SUB-ASSEMBLY |
*2 |
OIL FILLER CAP SUB-ASSEMBLY |
|
*3 |
GASKET |
*4 |
OIL PAN DRAIN PLUG |
.png) |
Tightening torque for "Major areas involving basic vehicle performance such as moving/turning/stopping": N*m (kgf*cm, ft.*lbf) |
.png) |
N*m (kgf*cm, ft.*lbf): Specified torque |
|
● |
Non-reusable part |
- |
- |
Replacement
REPLACEMENT
CAUTION / NOTICE / HINT
CAUTION:
- Prolonged and repeated contact with engine oil will result in the removal of natural oils from the skin, leading to dryness, irritation and dermatitis. In addition, used engine oil contains potentially harmful contaminants which may cause skin cancer.
- Wear protective clothing and gloves. Avoid contact with used oil. If contact occurs, wash your skin thoroughly with soap or waterless hand cleaner. Never use gasoline, thinners, or solvents to wash the skin.
- In order to protect the environment, dispose of used oil and used oil filters at designated disposal sites only.
PROCEDURE
1. REMOVE CENTER NO. 4 ENGINE UNDER COVER
|
(a) Remove the 4 screws and center No. 4 engine under cover. |
|
2. DRAIN ENGINE OIL
(a) Remove the oil filler cap sub-assembly.
(b) Remove the oil pan drain plug and gasket, and drain the engine oil into a container.
(c) Clean the oil pan drain plug.
(d) Install a new gasket to the oil pan drain plug.
(e) Install the oil pan drain plug.
Torque:
40 N·m {408 kgf·cm, 30 ft·lbf}
3. REMOVE OIL FILTER SUB-ASSEMBLY
(a) Using SST, remove the oil filter sub-assembly.
SST: 09228-06502
4. INSTALL OIL FILTER SUB-ASSEMBLY
(a) Check and clean the oil filter sub-assembly installation surface.
(b) Apply clean engine oil to the gasket of a new oil filter sub-assembly.
(c) Lightly screw the oil filter sub-assembly into place by hand. Tighten it until the gasket contacts the seat.
(d) Using SST, tighten the oil filter sub-assembly.
SST: 09228-06502
(1) Depending on the work space available, choose from the following:
- If enough space is available, use a torque wrench to tighten the oil filter sub-assembly.
Torque:
17.5 N·m {178 kgf·cm, 13 ft·lbf}
- If not enough space is available to use a torque wrench, tighten the oil filter sub-assembly 3/4 of a turn by hand or using a common wrench.
5. ADD ENGINE OIL
(a) Add new engine oil and install the oil filler cap sub-assembly.
Standard Oil Grade:|
Oil Grade |
Oil Viscosity (SAE) |
|---|---|
|
API SN/RC multigrade engine oil |
0W-16 |
|
Item |
Standard Condition |
|---|---|
|
Drain and refill with oil filter change |
4.5 liters (4.8 US qts, 4.0 Imp. qts) |
|
Drain and refill without oil filter change |
4.2 liters (4.4 US qts, 3.7 Imp. qts) |
|
Dry fill |
5.4 liters (5.7 US qts, 4.8 Imp. qts) |
NOTICE:
- When cleaning the No. 1 engine cover sub-assembly, do not use organic solvents such as brake cleaner as the No. 1 engine cover sub-assembly is made of urethane.
- Make sure to use a neutral detergent when cleaning the No. 1 engine cover sub-assembly.
6. INSPECT FOR ENGINE OIL LEAK
(a) Connect the Techstream to the DLC3.
(b) Turn the power switch on (IG).
(c) Turn the Techstream on.
(d) Put the engine in inspection Mode (Maintenance Mode).
Powertrain > Hybrid Control > Utility|
Tester Display |
|---|
|
Inspection Mode |
(e) Start the engine. Make sure that there are no engine oil leaks from the area that was worked on.
7. CHECK ENGINE OIL LEVEL
Click here .gif)
8. INSTALL CENTER NO. 4 ENGINE UNDER COVER
(a) Install the center No. 4 engine under cover with the 4 screws.
READ NEXT:
 Components
COMPONENTS
ILLUSTRATION
*1
IGNITION COIL ASSEMBLY
*2
NO. 1 ENGINE COVER SUB-ASSEMBLY
*3
SPARK PLUG
-
-
Removal
REMOVAL
CAUTION / NOTICE / HINT
The necessary procedures (adjustment, calibration, initialization, or registration)
that must be performed after parts are removed and installed, or replaced during
SEE MORE:
Installation
INSTALLATION PROCEDURE 1. INSTALL STEERING GEAR HEAT INSULATOR (for 2GR-FKS) (a) Install the steering gear heat insulator to the rack and pinion power steering gear assembly with the 2 bolts in the order shown in the illustration. Torque: 8.0 N·m {82 kgf·cm, 71 in·lbf} 2. INSTALL
Installation
INSTALLATION CAUTION / NOTICE / HINT HINT:
Use the same procedure for the RH side and LH side.
The following procedure is for the LH side.
PROCEDURE 1. INSTALL OUTER REAR VIEW MIRROR ASSEMBLY (a) Engage the 2 guides and claw. (b) Install the outer rear view mirror assembly with the 3 nuts. T
