Lexus ES: Window Glass Antenna Wire
On-vehicle Inspection
ON-VEHICLE INSPECTION
PROCEDURE
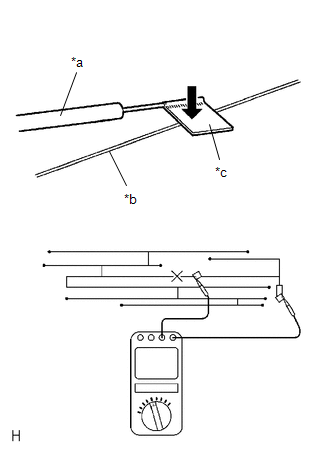
1. INSPECT WINDOW GLASS ANTENNA WIRE
| (a) Check the continuity of the antenna. HINT: Check for continuity at the center of each antenna wire as shown in the illustration. NOTICE:
OK: There is continuity in the antenna. If the result is not as specified, repair the window glass antenna wire. |
|
Repair
REPAIR
PROCEDURE
1. REPAIR WINDOW GLASS ANTENNA WIRE

| *a | Repair Point |
| *b | Masking Tape |
| *c | Broken Wire |
(a) Clean the broken wire tips with a grease, wax and silicone remover.
(b) Place masking tape along both sides of the wire to be repaired.
(c) Thoroughly mix the repair agent (Dupont paste No. 4817 or equivalent).
| (d) Using a fine tip brush, apply a small amount of the repair agent to the wire. |
|
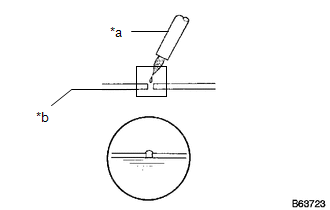
(e) After a few minutes, remove the masking tape.
READ NEXT:
 Components
COMPONENTS ILLUSTRATION *1 BACK-UP BATTERY *2 TRANSCEIVER COVER
SEE MORE:
Generator Resolver Circuit
DESCRIPTION The cause of this malfunction may be the generator resolver. Check the generator resolver internal resistance and connection condition from the inverter to the resolver. Related Parts Check Area Inspection Wire harness and connector between the inverter and generator resolver
Disassembly
DISASSEMBLY PROCEDURE 1. REMOVE NO. 4 ROCKER PANEL MOULDING PROTECTOR (a) Remove the No. 4 rocker panel moulding protector. 2. REMOVE NO. 5 ROCKER PANEL MOULDING PROTECTOR (a) Remove the No. 5 rocker panel moulding protector.
