
Lexus ES: Voice Guidance Circuit between Radio Receiver and Stereo Component Amplifier
DESCRIPTION
Using this circuit, the radio receiver assembly sends signals to the stereo component amplifier assembly.
WIRING DIAGRAM
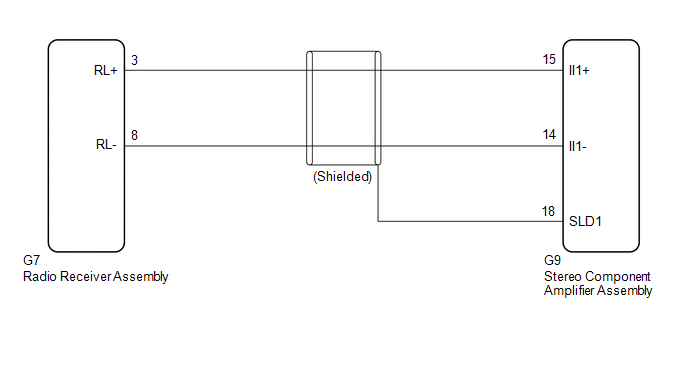
PROCEDURE
| 1. | CHECK HARNESS AND CONNECTOR (RADIO RECEIVER ASSEMBLY - STEREO COMPONENT AMPLIFIER ASSEMBLY) |
(a) Disconnect the G7 radio receiver assembly connector.
(b) Disconnect the G9 stereo component amplifier assembly connector.
(c) Measure the resistance according to the value(s) in the table below.
Standard Resistance:
| Tester connection | Condition | Specified condition |
|---|---|---|
| G7-3 (RL+) - G9-15 (II1+) | Always | Below 1 Ω |
| G7-8 (RL-) - G9-14 (II1-) | Always | Below 1 Ω |
| G9-18 (SLD1) - Body ground | Always | 10 kΩ or higher |
| G7-3 (RL+) or G9-15 (II1+) - Body ground | Always | 10 kΩ or higher |
| G7-8 (RL-) or G9-14 (II1-) - Body ground | Always | 10 kΩ or higher |
| OK |  | PROCEED TO NEXT SUSPECTED AREA SHOWN IN PROBLEM SYMPTOMS TABLE |
.gif)
| NG | | REPAIR OR REPLACE HARNESS OR CONNECTOR |
READ NEXT:
 Voice Guidance does not Function
CAUTION / NOTICE / HINT NOTICE:
Depending on the parts that are replaced during vehicle inspection or maintenance, performing initialization, registration or calibration may be needed. Refer to Pre
Voice is not Recognized
PROCEDURE 1. CHECK CONDITION (a) While paying attention to the condition of the spoken voice command, perform a voice recognition operation. OK: Voice command is recognized normally. HINT:
SEE MORE:
Terminals Of Ecm
TERMINALS OF ECM HINT: The standard voltage, resistance and waveform between each pair of the ECM terminals is shown in the table below. The appropriate conditions for checking each pair of the terminals is also indicated. The result of checks should be compared with the standard voltage, resistanc
Removal
REMOVAL CAUTION / NOTICE / HINT HINT:
Use the same procedure for the RH side and LH side.
The following procedure is for the LH side.
PROCEDURE 1. REMOVE NO. 2 DOOR TRIM PAD Click here 2. REMOVE MULTIPLEX NETWORK MASTER SWITCH ASSEMBLY WITH FRONT DOOR UPPER ARMREST BASE PANEL (for Driver
