Lexus ES: Replacement
REPLACEMENT
PROCEDURE
1. REMOVE FRONT WHEEL OPENING EXTENSION PAD RH
Click here .gif)
2. REMOVE FRONT WHEEL OPENING EXTENSION PAD LH
Click here
3. REMOVE NO. 1 ENGINE UNDER COVER
Click here
4. REMOVE NO. 2 ENGINE UNDER COVER ASSEMBLY
Click here
5. REPLACE HYBRID TRANSAXLE FLUID
(a) Lift the vehicle. [#1]
NOTICE:
Set the vehicle on a lift so that the vehicle is kept level when it is lifted up (make sure that the tilt angle from the front to rear of the vehicle is within +/- 1°).
|
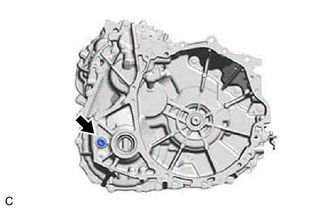
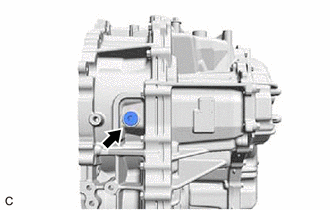
(b) Using a 10 mm hexagon socket wrench, remove the filler plug and gasket from the hybrid vehicle transaxle assembly. [#2] |
|
|
(c) Using a 10 mm hexagon socket wrench, remove the drain plug and gasket from the hybrid vehicle transaxle assembly and drain the hybrid transaxle fluid. [#3] |
|
(d) Using a 10 mm hexagon socket wrench, temporarily install the drain plug and gasket to the hybrid vehicle transaxle assembly. [#4]
HINT:
Reuse the old gasket as the drain plug will be removed again.
|
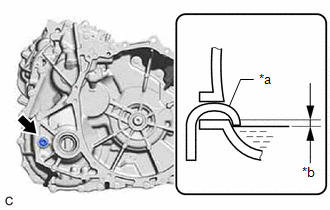
(e) Add hybrid transaxle fluid until the hybrid transaxle fluid level is between 0 to 10 mm (0 to 0.394 in.) from the bottom lip of the filler plug opening. [#5] NOTICE:
|
|
(f) Using a 10 mm hexagon socket wrench, temporarily install the filler plug and gasket to the hybrid vehicle transaxle assembly. [#6]
HINT:
Reuse the old gasket as the filler plug will be removed again.
(g) Lower the vehicle. [#7]
(h) Put the engine in Inspection Mode (Maintenance Mode). [#8]
Click here
(i) Idle the engine for 30 seconds with the power switch on (READY). [#9]
(j) Turn the power switch off. [#10]
(k) Repeat steps [#1] to [#10].
(l) Repeat steps [#1] to [#3].
(m) Using a 10 mm hexagon socket wrench, install the drain plug and a new gasket to the hybrid vehicle transaxle assembly.
Torque:
50 N·m {510 kgf·cm, 37 ft·lbf}
(n) Using a 10 mm hexagon socket wrench, temporarily install the filler plug and gasket to the hybrid vehicle transaxle assembly.
HINT:
Reuse the old gasket as the filler plug will be removed again.
6. ADD HYBRID TRANSAXLE FLUID
Click here
7. INSPECT HYBRID TRANSAXLE FLUID
Click here
8. INSPECT FOR HYBRID TRANSAXLE FLUID LEAK
9. INSTALL NO. 2 ENGINE UNDER COVER ASSEMBLY
Click here
10. INSTALL NO. 1 ENGINE UNDER COVER
Click here
11. INSTALL FRONT WHEEL OPENING EXTENSION PAD LH
Click here
12. INSTALL FRONT WHEEL OPENING EXTENSION PAD RH
Click here
READ NEXT:
 Components
COMPONENTS
ILLUSTRATION
*1
REAR FLEXIBLE HOSE
*2
GASKET
*3
UNION BOLT
*4
BRAKE LINE
Removal
REMOVAL
CAUTION / NOTICE / HINT
The necessary procedures (adjustment, calibration, initialization, or registration)
that must be performed after parts are removed and installed, or replaced during
SEE MORE:
Dtc Check / Clear
DTC CHECK / CLEAR CHECK DTC (a) Connect the Techstream to the DLC3. (b) Turn the power switch on (IG). (c) Turn the Techstream on. (d) Enter the following menus: Body Electrical / Mirror L or Mirror R / Trouble Codes. Body Electrical > Mirror L > Trouble Codes Body Electrical > Mirror R >
Hybrid/EV Battery Negative Contactor Circuit Short to Auxiliary Battery or Open (P0ADD15)
DESCRIPTION Refer to the description for DTC P0AE411. Click here DTC No. Detection Item DTC Detection Condition Trouble Area MIL Warning Indicate P0ADD15 Hybrid/EV Battery Negative Contactor Circuit Short to Auxiliary Battery or Open Open or short to +B in SMRG circuit: Primar
