Lexus ES: Removal
REMOVAL
PROCEDURE
1. REMOVE FRONT DOOR SCUFF PLATE LH
Click here .gif)
2. REMOVE COWL SIDE TRIM BOARD LH
Click here
3. REMOVE FRONT DOOR OPENING TRIM COVER LH
Click here
4. REMOVE INSTRUMENT SIDE PANEL LH
Click here
5. REMOVE NO. 1 INSTRUMENT PANEL UNDER COVER SUB-ASSEMBLY
Click here
6. REMOVE LOWER INSTRUMENT PANEL FINISH PANEL SUB-ASSEMBLY
Click here
7. REMOVE NO. 1 CLEARANCE WARNING BUZZER
| (a) Disengage the clamp. |
|
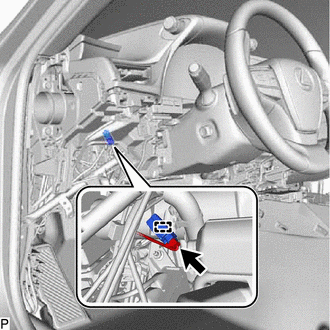
(b) Disconnect the connector to remove the No. 1 clearance warning buzzer.
READ NEXT:
 Components
COMPONENTS ILLUSTRATION *A for HV Model *B for Gasoline Model *1 REAR DOOR SCUFF PLATE LH *2 REAR DOOR SCUFF PLATE RH *3 REAR SEAT SIDE GARNISH LH *4 REAR SEAT SIDE GARNI
Installation
INSTALLATION PROCEDURE 1. INSTALL NO. 2 CLEARANCE WARNING BUZZER (a) Connect the connector. (b) Engage the clamp to install the No. 2 clearance warning buzzer. 2. INSTALL PACKAGE TRAY TRIM PANEL ASSEM
SEE MORE:
Removal
REMOVAL CAUTION / NOTICE / HINT HINT:
Use the same procedure for the RH side and LH side.
The following procedure is for the LH side.
PROCEDURE 1. REMOVE OUTER MIRROR (a) Apply protective tape to the areas shown in the illustration. Protective Tape Move in this Direction (b)
How To Proceed With Troubleshooting
CAUTION / NOTICE / HINT HINT:
The ECM is connected to the CAN communication system. Therefore, before starting troubleshooting, make sure to check that there are no malfunctions in the CAN communication system.
*: Use the Techstream.
PROCEDURE 1. VEHICLE BROUGHT TO WORKSHOP
NE
© 2016-2026 Copyright www.lexguide.net
