Lexus ES: Removal
REMOVAL
PROCEDURE
1. REMOVE RAIN SENSOR COVER
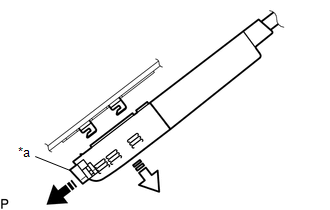
| *a | Stopper |
.png) | Remove in this Direction (1) |
.png) | Remove in this Direction (2) |
(a) Release the stopper by pulling it out and disconnect the rain sensor as indicated by the arrows, in the order shown in the illustration.
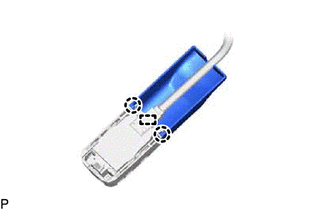
| (b) Disengage the 2 claws and guide to remove the rain sensor cover. |
|
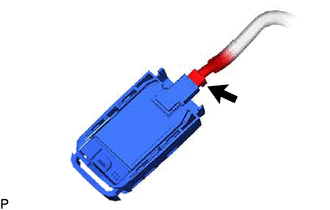
2. REMOVE RAIN SENSOR
| (a) Disconnect the connector to remove the rain sensor. |
|
READ NEXT:
 Installation
INSTALLATION PROCEDURE 1. INSTALL RAIN SENSOR TAPE HINT: The rain sensor tape is reusable. Only replace the tape if it is damaged or contaminated with foreign matter. (a) Clean the sensing portion of
Relay
On-vehicle InspectionON-VEHICLE INSPECTION PROCEDURE 1. INSPECT WIPER RELAY (a) Measure the resistance according to the value(s) in the table below. Standard Resistance: Tester Connection Co
SEE MORE:
Components
COMPONENTS ILLUSTRATION *1 BATTERY CLAMP SUB-ASSEMBLY - - N*m (kgf*cm, ft.*lbf): Specified torque - - ILLUSTRATION *1 FRONT LOWER NO. 1 FLOOR HEAT INSULATOR - - N*m (kgf*cm, ft.*lbf): Specified torque - - ILLUSTRATION *1 NO. 1 CONSOLE BOX DUCT
Components
COMPONENTS ILLUSTRATION *1 REAR NO. 2 SUSPENSION ARM ASSEMBLY LH *2 REAR NO. 2 SUSPENSION ARM ASSEMBLY RH *3 REAR SUSPENSION MEMBER SUB-ASSEMBLY *4 REAR UPPER CONTROL ARM ASSEMBLY LH *5 REAR UPPER CONTROL ARM ASSEMBLY RH *6 REAR SUSPENSION MEMBER LOWER STOPPER *7
© 2016-2026 Copyright www.lexguide.net
