Lexus ES: Components
Lexus ES (XZ10) Service Manual / Suspension / Rear Suspension / Rear Suspension Member (for Awd) / Components
COMPONENTS
ILLUSTRATION
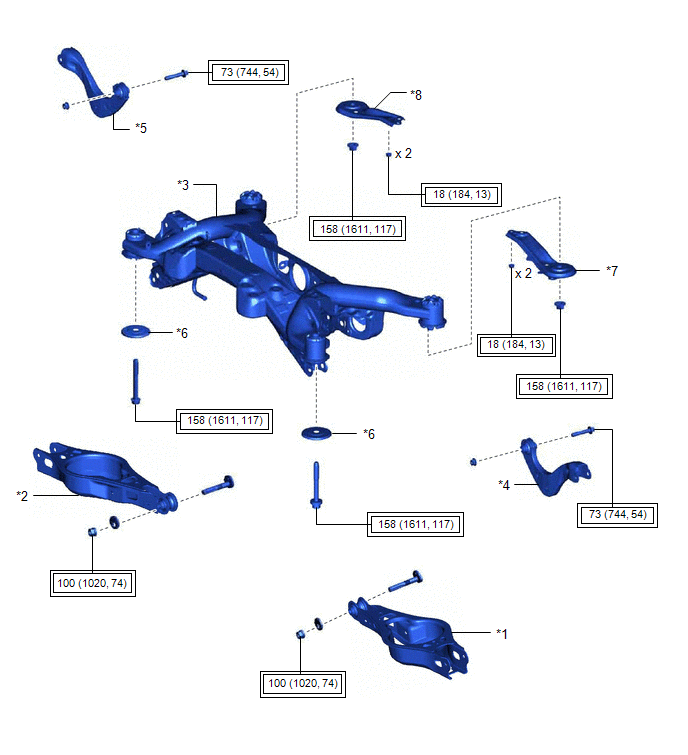
| *1 | REAR NO. 2 SUSPENSION ARM ASSEMBLY LH | *2 | REAR NO. 2 SUSPENSION ARM ASSEMBLY RH |
| *3 | REAR SUSPENSION MEMBER SUB-ASSEMBLY | *4 | REAR UPPER CONTROL ARM ASSEMBLY LH |
| *5 | REAR UPPER CONTROL ARM ASSEMBLY RH | *6 | REAR SUSPENSION MEMBER LOWER STOPPER |
| *7 | REAR SUSPENSION MEMBER LOWER BRACE LH | *8 | REAR SUSPENSION MEMBER LOWER BRACE RH |
.png) | Tightening torque for "Major areas involving basic vehicle performance such as moving/turning/stopping": N*m (kgf*cm, ft.*lbf) | - | - |
ILLUSTRATION

| *1 | REAR NO. 1 DIFFERENTIAL MOUNT CUSHION | *2 | REAR SUSPENSION MEMBER FRONT BODY MOUNTING CUSHION |
| *3 | REAR SUSPENSION MEMBER REAR BODY MOUNT CUSHION LH | *4 | REAR SUSPENSION MEMBER REAR BODY MOUNT CUSHION RH |
| *5 | REAR SUSPENSION MEMBER CUSHION | *6 | HOLE PLUG |
| ● | Non-reusable part | - | - |
READ NEXT:
 Installation
INSTALLATION PROCEDURE 1. INSTALL HOLE PLUG (a) Install the 10 hole plugs to the rear suspension member sub-assembly. HINT: There are 2 different shapes of hole plug. 2. INSTALL REAR SU
Problem Symptoms Table
PROBLEM SYMPTOMS TABLE HINT: Use the table below to help determine the cause of problem symptoms. If multiple suspected areas are listed, the potential causes of the symptoms are listed in order of pr
SEE MORE:
Blind Spot Monitor Master Module (C1AB6)
DESCRIPTION This DTC is stored when the blind spot monitor sensor RH detects an internal malfunction. DTC No. Detection Item DTC Detection Condition Trouble Area C1AB6 Blind Spot Monitor Master Module The blind spot monitor sensor RH (master) detects an internal malfunction Blind
Operation Check
OPERATION CHECK CHECK ELECTRICAL REMOTE CONTROL MIRROR FUNCTION (a) Turn the power switch on (IG). (b) With L on the mirror select switch selected, check that the outer rear view mirror assembly LH surface moves up, down, left and right normally. (c) With R on the mirror select switch selected, chec
© 2016-2026 Copyright www.lexguide.net
