Lexus ES: Removal
REMOVAL
CAUTION / NOTICE / HINT
HINT:
When removing a name plate or emblem, heat the vehicle body and name plate or emblem using a heat light.
Heating Temperature| Item | Temperature |
|---|---|
| Vehicle Body | 40 to 60°C (104 to 140°F) |
| Name Plate or Emblem | 20 to 30°C (68 to 86°F) |
CAUTION:
- Do not touch the heat light and heated parts, touching the heat light may result in burns.
- Touching heated parts for a long time may result in burns.
.png)
| *a | Heated Part |
| *b | Heat Light |
NOTICE:
Do not heat the vehicle body, name plate or emblem excessively.
PROCEDURE
1. REMOVE SYMBOL EMBLEM
(a) Apply protective tape around the symbol emblem as shown in the illustration.
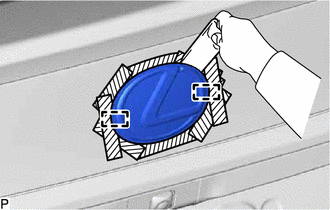
.png) | Protective Tape |
(b) Using a moulding remover, separate the double-sided tape and disengage the 2 pins to remove the symbol emblem.
NOTICE:
Be careful not to damage the luggage compartment door panel.
2. REMOVE NO. 3 LUGGAGE COMPARTMENT DOOR PLATE (for Mesh Type Radiator Grille)
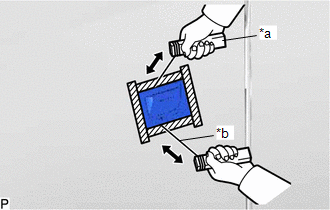
(a) Apply protective tape around the No. 3 luggage compartment door plate as shown in the illustration.
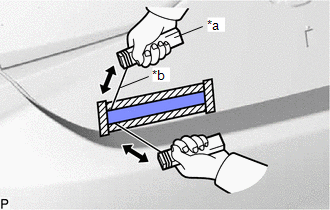
| *a | Wooden Block |
| *b | Piano Wire |
| | Protective Tape |
(b) Insert a piano wire between the luggage compartment door panel and No. 3 luggage compartment door plate.
(c) Tie objects that can serve as handles (for example, wooden blocks) to both wire ends.
(d) Pull the piano wire and cut the double-sided tape that holds the No. 3 luggage compartment door plate to the luggage compartment door panel.
NOTICE:
Be careful not to damage the luggage compartment door panel.
(e) Remove the No. 3 luggage compartment door plate.
3. REMOVE NO. 2 LUGGAGE COMPARTMENT DOOR NAME PLATE
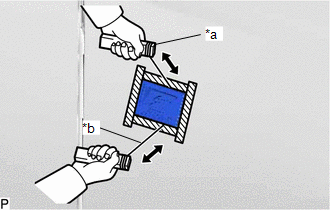
(a) Apply protective tape around the No. 2 luggage compartment door name plate as shown in the illustration.
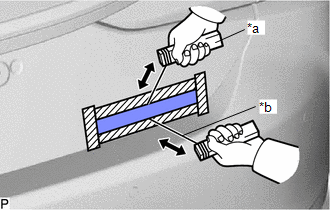
| *a | Wooden Block |
| *b | Piano Wire |
| | Protective Tape |
(b) Insert a piano wire between the luggage compartment door panel and No. 2 luggage compartment door name plate.
(c) Tie objects that can serve as handles (for example, wooden blocks) to both wire ends.
(d) Pull the piano wire and cut the double-sided tape that holds the No. 2 luggage compartment door name plate to the luggage compartment door panel.
NOTICE:
Be careful not to damage the luggage compartment door panel.
(e) Remove the No. 2 luggage compartment door name plate.
4. REMOVE BODY SIDE NAME PLATE (for HV Model)
(a) Apply protective tape around the body side name plate as shown in the illustration.
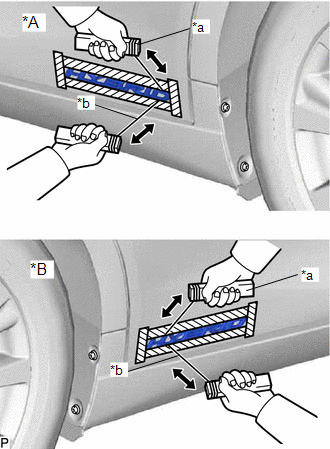
| *A | for LH Side |
| *B | for RH Side |
| *a | Wooden Block |
| *b | Piano Wire |
| | Protective Tape |
(b) Insert a piano wire between the rear door panel and body side name plate.
(c) Tie objects that can serve as handles (for example, wooden blocks) to both wire ends.
(d) Pull the piano wire and cut the double-sided tape that holds the body side name plate to the rear door panel.
NOTICE:
Be careful not to damage the rear door panel.
(e) Remove the body side name plate.
5. REMOVE NO. 2 FRONT FENDER NAME PLATE (for Mesh Type Radiator Grille)
(a) Apply protective tape around the No. 2 front fender name plate as shown in the illustration.
| *a | Wooden Block |
| *b | Piano Wire |
| | Protective Tape |
(b) Insert a piano wire between the front fender panel and No. 2 front fender name plate.
(c) Tie objects that can serve as handles (for example, wooden blocks) to both wire ends.
(d) Pull the piano wire and cut the double-sided tape that holds the No. 2 front fender name plate to the front fender panel.
NOTICE:
Be careful not to damage the front fender panel.
(e) Remove the No. 2 front fender name plate.
6. REMOVE NO. 1 FRONT FENDER NAME PLATE (for Mesh Type Radiator Grille)
(a) Apply protective tape around the No. 1 front fender name plate as shown in the illustration.
| *a | Wooden Block |
| *b | Piano Wire |
| | Protective Tape |
(b) Insert a piano wire between the front fender panel and No. 1 front fender name plate.
(c) Tie objects that can serve as handles (for example, wooden blocks) to both wire ends.
(d) Pull the piano wire and cut the double-sided tape that holds the No. 1 front fender name plate to the front fender panel.
NOTICE:
Be careful not to damage the front fender panel.
(e) Remove the No. 1 front fender name plate.
READ NEXT:
 Installation
INSTALLATION CAUTION / NOTICE / HINT HINT: When installing a name plate or emblem, heat the vehicle body and name plate or emblem using a heat light. Heating Temperature Item Temperature Vehi
Quarter Garnish
ComponentsCOMPONENTS ILLUSTRATION *1 REAR ROOF DRIP SIDE FINISH MOULDING - - RemovalREMOVAL CAUTION / NOTICE / HINT HINT:
Use the same procedure for the RH side and LH side.
The fo
SEE MORE:
XM Tuner Antenna Disconnected (B15FE,B15FF)
DESCRIPTION These DTCs are stored when a malfunction occurs in the telephone antenna assembly which is connected to the radio receiver assembly. DTC No. Detection Item DTC Detection Condition Trouble Area B15FE XM Tuner Antenna Disconnected The telephone antenna assembly is not conn
High Voltage Power Resource Circuit Short during Ready ON (P1C8449)
DTC SUMMARY MALFUNCTION DESCRIPTION The hybrid vehicle control ECU monitors the high-voltage wiring between the HV battery and inverter with converter assembly and detects an open circuit malfunction. HINT:
This DTC is differentiated from P300449 based on detection timing (after power switch is t
