Lexus ES: Installation
INSTALLATION
CAUTION / NOTICE / HINT
HINT:
When installing a name plate or emblem, heat the vehicle body and name plate or emblem using a heat light.
Heating Temperature| Item | Temperature |
|---|---|
| Vehicle Body | 40 to 60°C (104 to 140°F) |
| Name Plate or Emblem | 20 to 30°C (68 to 86°F) |
CAUTION:
- Do not touch the heat light and heated parts, touching the heat light may result in burns.
- Touching heated parts for a long time may result in burns.
.png)
| *a | Heated Part |
| *b | Heat Light |
NOTICE:
Do not heat the vehicle body, name plate or emblem excessively.
PROCEDURE
1. INSTALL NO. 1 FRONT FENDER NAME PLATE (for Mesh Type Radiator Grille)
(a) Clean the front fender panel surface.
(1) Using a heat light, heat the front fender panel surface.
(2) Remove any remaining double-sided tape from the front fender panel.
(3) Wipe off any tape adhesive residue with cleaner.
(b) Using a heat light, heat the front fender panel and a new No. 1 front fender name plate.
(c) Remove the release paper from the No. 1 front fender name plate.
HINT:
After removing the release paper, keep the exposed adhesive free from foreign matter.
(d) Install the No. 1 front fender name plate as shown in the illustration.
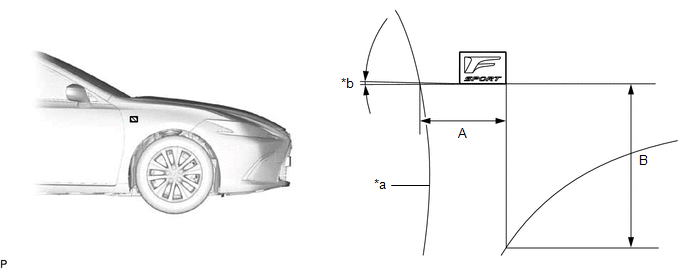
| *a | Profile of Front Fender Panel | *b | 2° |
Standard Measurement:
| Area | Measurement | Area | Measurement |
|---|---|---|---|
| A | 115.8 mm (4.56 in.) | B | 226.3 mm (8.91 in.) |
NOTICE:
Press the No. 1 front fender name plate firmly to install it.
2. INSTALL NO. 2 FRONT FENDER NAME PLATE (for Mesh Type Radiator Grille)
(a) Clean the front fender panel surface.
(1) Using a heat light, heat the front fender panel surface.
(2) Remove any remaining double-sided tape from the front fender panel.
(3) Wipe off any tape adhesive residue with cleaner.
(b) Using a heat light, heat the front fender panel and a new No. 2 front fender name plate.
(c) Remove the release paper from the No. 2 front fender name plate.
HINT:
After removing the release paper, keep the exposed adhesive free from foreign matter.
(d) Install the No. 2 front fender name plate as shown in the illustration.
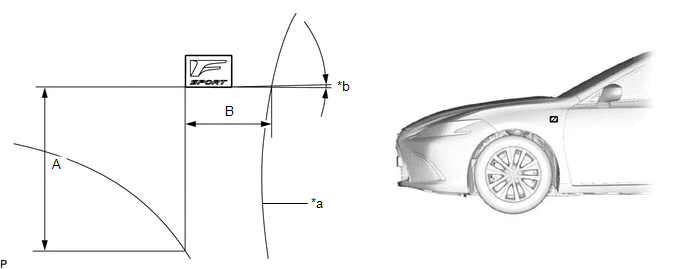
| *a | Profile of Front Fender Panel | *b | 1.1° |
Standard Measurement:
| Area | Measurement | Area | Measurement |
|---|---|---|---|
| A | 226.3 mm (8.91 in.) | B | 116.3 mm (4.58 in.) |
NOTICE:
Press the No. 2 front fender name plate firmly to install it.
3. INSTALL BODY SIDE NAME PLATE (for HV Model)
(a) Clean the rear door panel surface.
(1) Using a heat light, heat the rear door panel surface.
(2) Remove any remaining double-sided tape from the rear door panel.
(3) Wipe off any tape adhesive residue with cleaner.
(b) Using a heat light, heat the rear door panel and a new body side name plate.
(c) Remove the release paper from the body side name plate.
HINT:
After removing the release paper, keep the exposed adhesive free from foreign matter.
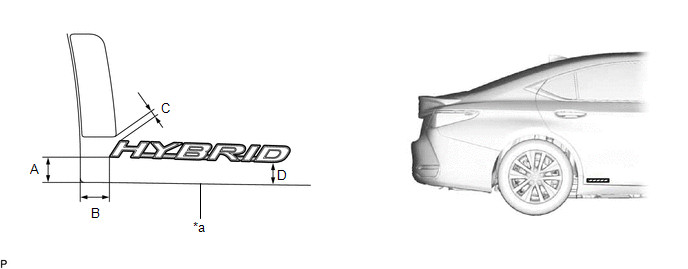
(d) Install the body side name plate as shown in the illustration.
for LH Side:

| *a | Profile of Rear Door Panel | - | - |
Standard Measurement:
| Area | Measurement | Area | Measurement |
|---|---|---|---|
| A | 25.0 mm (0.984 in.) | B | 5.0 mm (0.197 in.) |
| C | 30.0 mm (1.18 in.) | D | 43.8 mm (1.72 in.) |
NOTICE:
Press the body side name plate firmly to install it.
for RH Side:
| *a | Profile of Rear Door Panel | - | - |
Standard Measurement:
| Area | Measurement | Area | Measurement |
|---|---|---|---|
| A | 27.3 mm (1.07 in.) | B | 30.8 mm (1.21 in.) |
| C | 7.4 mm (0.291 in.) | D | 25.3 mm (0.996 in.) |
NOTICE:
Press the body side name plate firmly to install it.
4. INSTALL NO. 2 LUGGAGE COMPARTMENT DOOR NAME PLATE
(a) Clean the luggage compartment door panel surface.
(1) Using a heat light, heat the luggage compartment door panel surface.
(2) Remove any remaining double-sided tape from the luggage compartment door panel.
(3) Wipe off any tape adhesive residue with cleaner.
(b) Using a heat light, heat the luggage compartment door panel and a new No. 2 luggage compartment door name plate.
(c) Remove the release paper from the No. 2 luggage compartment door name plate.
HINT:
After removing the release paper, keep the exposed adhesive free from foreign matter.
(d) Install the No. 2 luggage compartment door name plate as shown in the illustration.
for ES 350 Plate:
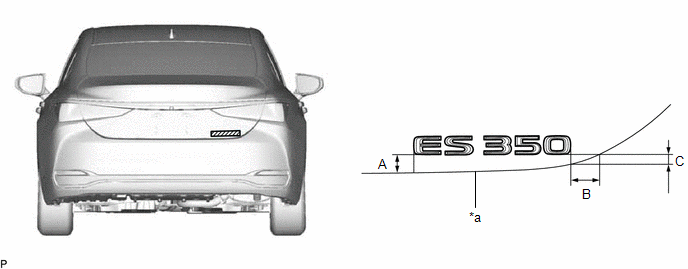
| *a | Profile of Luggage Compartment Door Panel | - | - |
Standard Measurement:
| Area | Measurement | Area | Measurement |
|---|---|---|---|
| A | 19.0 mm (0.748 in.) | B | 29.3 mm (1.15 in.) |
| C | 10.5 mm (0.413 in.) | - | - |
NOTICE:
Press the No. 2 luggage compartment door name plate firmly to install it.
for ES 250 AWD Plate:
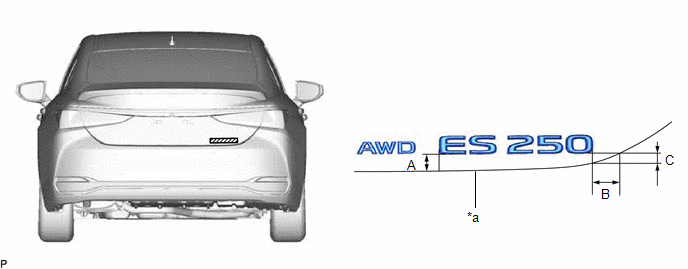
| *a | Profile of Luggage Compartment Door Panel | - | - |
Standard Measurement:
| Area | Measurement | Area | Measurement |
|---|---|---|---|
| A | 19.0 mm (0.748 in.) | B | 29.3 mm (1.15 in.) |
| C | 10.5 mm (0.413 in.) | - | - |
NOTICE:
Press the No. 2 luggage compartment door name plate firmly to install it.
for ES300h Plate:
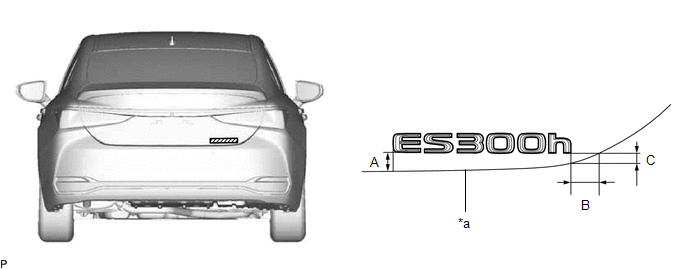
| *a | Profile of Luggage Compartment Door Panel | - | - |
Standard Measurement:
| Area | Measurement | Area | Measurement |
|---|---|---|---|
| A | 19.0 mm (0.748 in.) | B | 29.3 mm (1.15 in.) |
| C | 10.5 mm (0.413 in.) | - | - |
NOTICE:
Press the No. 2 luggage compartment door name plate firmly to install it.
5. INSTALL NO. 3 LUGGAGE COMPARTMENT DOOR PLATE (for Mesh Type Radiator Grille)
(a) Clean the luggage compartment door panel surface.
(1) Using a heat light, heat the luggage compartment door panel surface.
(2) Remove any remaining double-sided tape from the luggage compartment door panel.
(3) Wipe off any tape adhesive residue with cleaner.
(b) Using a heat light, heat the luggage compartment door panel and a new No. 3 luggage compartment door plate.
(c) Remove the release paper from the No. 3 luggage compartment door plate.
HINT:
After removing the release paper, keep the exposed adhesive free from foreign matter.
(d) Install the No. 3 luggage compartment door plate as shown in the illustration.
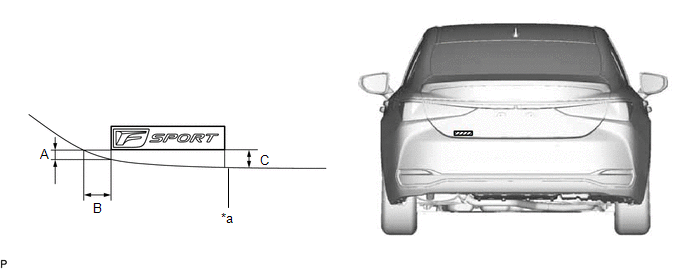
| *a | Profile of Luggage Compartment Door Panel | - | - |
Standard Measurement:
| Area | Measurement | Area | Measurement |
|---|---|---|---|
| A | 10.8 mm (0.425 in.) | B | 29.3 mm (1.15 in.) |
| C | 18.3 mm (0.721 in.) | - | - |
NOTICE:
Press the No. 3 luggage compartment door plate firmly to install it.
6. INSTALL SYMBOL EMBLEM
(a) Clean the luggage compartment door panel surface.
(1) Using a heat light, heat the luggage compartment door panel surface.
(2) Remove any remaining double-sided tape from the luggage compartment door panel.
(3) Wipe off any tape adhesive residue with cleaner.
(b) Using a heat light, heat the luggage compartment door panel and a new symbol emblem.
(c) Remove the release paper from the symbol emblem.
HINT:
After removing the release paper, keep the exposed adhesive free from foreign matter.
(d) Engage the 2 pins and install the symbol emblem.
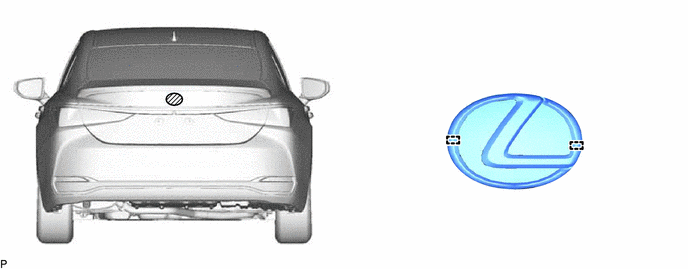
NOTICE:
Press the symbol emblem firmly to install it.
READ NEXT:
 Quarter Garnish
ComponentsCOMPONENTS ILLUSTRATION *1 REAR ROOF DRIP SIDE FINISH MOULDING - - RemovalREMOVAL CAUTION / NOTICE / HINT HINT:
Use the same procedure for the RH side and LH side.
The fo
Components
COMPONENTS ILLUSTRATION *1 REAR BUMPER ASSEMBLY *2 REAR COMBINATION LIGHT COVER LH *3 REAR COMBINATION LIGHT COVER RH - - ILLUSTRATION *A w/ Hands Free Power Trunk Lid -
SEE MORE:
Check Mode Procedure
CHECK MODE PROCEDURE DESCRIPTION (a) Check mode has a higher sensitivity to malfunctions and can detect malfunctions that normal mode cannot detect. Check mode can also detect all of the malfunctions that normal mode can detect. In check mode, DTCs are detected with 1 trip detection logic. CHECK MOD
Problem Symptoms Table
PROBLEM SYMPTOMS TABLE NOTICE:
The following inspection procedures for the parking assist monitor system are based on the assumption that the audio and visual system*1 or navigation system*2 is normal. If the audio and visual system*1 or navigation system*2 has any malfunctions, first proceed wit
