
Lexus ES: Removal
REMOVAL
PROCEDURE
1. REMOVE FUEL VAPOR CONTAINMENT VALVE (FUEL TANK SOLENOID MAIN VALVE ASSEMBLY)
| (a) Disconnect the fuel vapor containment valve (fuel tank solenoid main valve assembly) connector. |
|
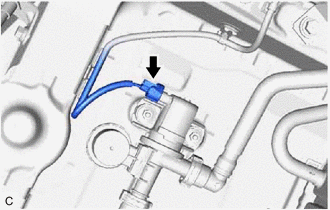
(b) Disconnect the fuel tank vent hose sub-assembly from the fuel vapor containment valve (fuel tank solenoid main valve assembly).
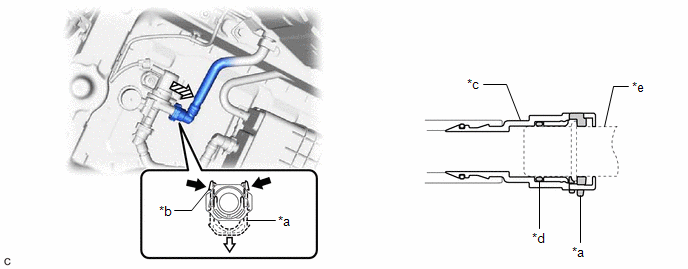
| *a | Retainer | *b | Tab |
| *c | Tube Connector | *d | O-ring |
| *e | Pipe (Fuel Vapor Containment Valve (Fuel Tank Solenoid Main Valve Assembly)) | - | - |
.png) | Pinch | .png) | Pull |
.png) | Pull off | - | - |
NOTICE:
- Remove any dirt or foreign matter on the tube connectors before performing this work.
- Do not allow any scratches or foreign matter to get on the parts when disconnecting them as the tube connector has an O-ring that seals the pipe (fuel vapor containment valve (fuel tank solenoid main valve assembly)).
- Perform this work by hand. Do not use any tools.
- Do not forcibly bend, twist or turn the fuel tank vent hose sub-assembly.
- Protect the disconnected parts by covering them with plastic bags after disconnecting the fuel tank vent hose sub-assembly.
- If the tube connector and pipe (fuel vapor containment valve (fuel tank solenoid main valve assembly)) are stuck, push and pull to release them.
HINT:
Do not remove the retainer.
(1) Pinch the tabs of the retainer to disengage the lock claws and pull it down.
(2) Pull off the fuel tank vent hose sub-assembly.
(c) Disconnect the fuel tank vent hose from the fuel vapor containment valve (fuel tank solenoid main valve assembly).

| *a | Retainer | *b | Tab |
| *c | Tube Connector | *d | O-ring |
| *e | Pipe (Fuel Vapor Containment Valve (Fuel Tank Solenoid Main Valve Assembly)) | - | - |
| | Pinch | | Pull |
| | Pull off | - | - |
NOTICE:
- Remove any dirt or foreign matter on the tube connectors before performing this work.
- Do not allow any scratches or foreign matter to get on the parts when disconnecting them as the tube connector has an O-ring that seals the pipe (fuel vapor containment valve (fuel tank solenoid main valve assembly)).
- Perform this work by hand. Do not use any tools.
- Do not forcibly bend, twist or turn the fuel tank vent hose.
- Protect the disconnected parts by covering them with plastic bags after disconnecting the fuel tank vent hose.
- If the tube connector and pipe (fuel vapor containment valve (fuel tank solenoid main valve assembly)) are stuck, push and pull to release them.
HINT:
Do not remove the retainer.
(1) Pinch the tabs of the retainer to disengage the lock claws and pull it down.
(2) Pull off the fuel tank vent hose.
| (d) Remove the 2 nuts and fuel vapor containment valve (fuel tank solenoid main valve assembly) from the vehicle body. |
|

READ NEXT:
 Inspection
INSPECTION PROCEDURE 1. INSPECT FUEL VAPOR CONTAINMENT VALVE (FUEL TANK SOLENOID MAIN VALVE ASSEMBLY) (a) Measure the resistance according to the value(s) in the table below. Standard Resistance:
Installation
INSTALLATION PROCEDURE 1. INSTALL FUEL VAPOR CONTAINMENT VALVE (FUEL TANK SOLENOID MAIN VALVE ASSEMBLY) (a) Install the fuel vapor containment valve (fuel tank solenoid main valve assembly) to the veh
SEE MORE:
Removal
REMOVAL PROCEDURE 1. REMOVE LUGGAGE COMPARTMENT FLOOR MAT Click here 2. REMOVE SPARE WHEEL COVER TRAY Click here 3. REMOVE REAR FLOOR FINISH PLATE Click here 4. REMOVE LUGGAGE COMPARTMENT TRIM COVER LH Click here 5. REMOVE LUGGAGE COMPARTMENT TRIM INNER COVER LH Click here 6. REMOVE FUEL F
Parts Location
PARTS LOCATION ILLUSTRATION *1 TRUNK AND FUEL SWITCH ASSEMBLY *2 LUGGAGE DOOR OPENING CANCEL SWITCH ASSEMBLY *3 DLC3 *4 MAIN BODY ECU (MULTIPLEX NETWORK BODY ECU) *5 INSTRUMENT PANEL JUNCTION BLOCK ASSEMBLY - DOOR BACK RELAY - TRUNK OPN FUSE *6 CERTIFICATION ECU (SMART
